
Small Laundry Room Makeover on a Budget
Come see the 2 day laundry room makeover done in a modern farmhouse style on a budget.
The first “makeover” our laundry room received was only a few months after we moved into our townhouse.
We didn’t plan on doing it – at. all.
However, disaster struck. After dragging my beloved blue washer and dryer through 2 different moves, the washing machine proceeded to completely die.
While we waded through the process of purchasing a new one and waiting for it to arrive, we decided to make a little lemonade with this crazy lemon of a situation…
In between trips to the laundromat, we emptied the small space and gave it a spiff up. Using paint from our previous house, we painted and hung some shelves with supplies we already had.
It was definitely better, but I’ve always wanted to spiff it up a bit more.
This past weekend was its time!
The 2 Day Laundry Room Makeover
Disclosure: I was compensated for this post by Schlage Canada. This post also contains affiliate links for your shopping convenience. If you choose to purchase through an affiliate link, I will receive a small compensation at no extra charge to you. (And, thank you!)
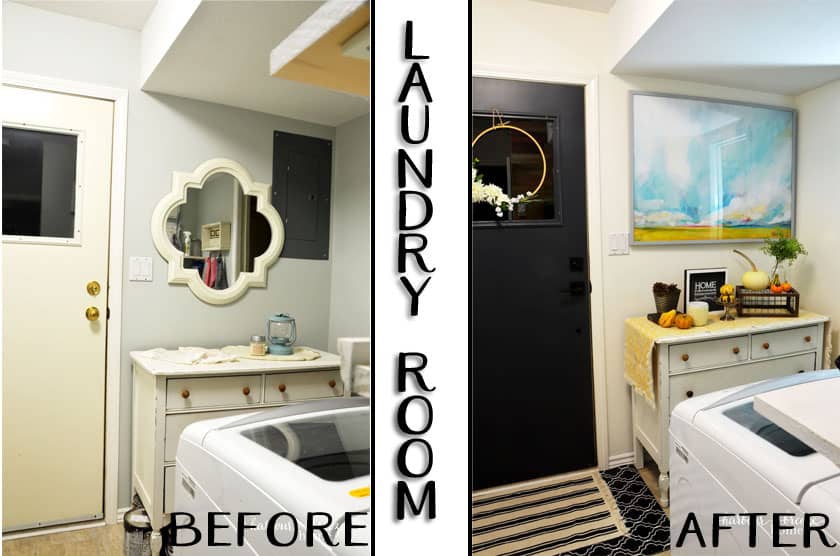
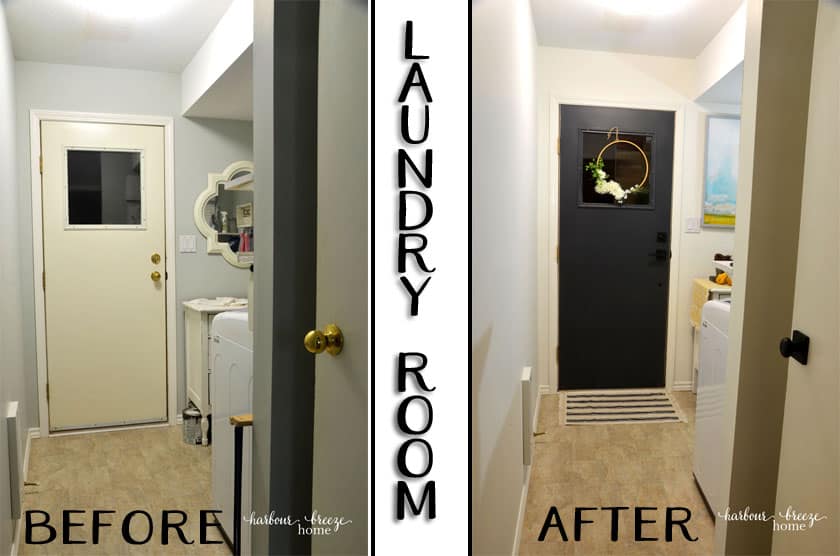
Come tour the small Laundry Room “before”
Off the kitchen, is a hallway area that leads an outside door and the laundry area.
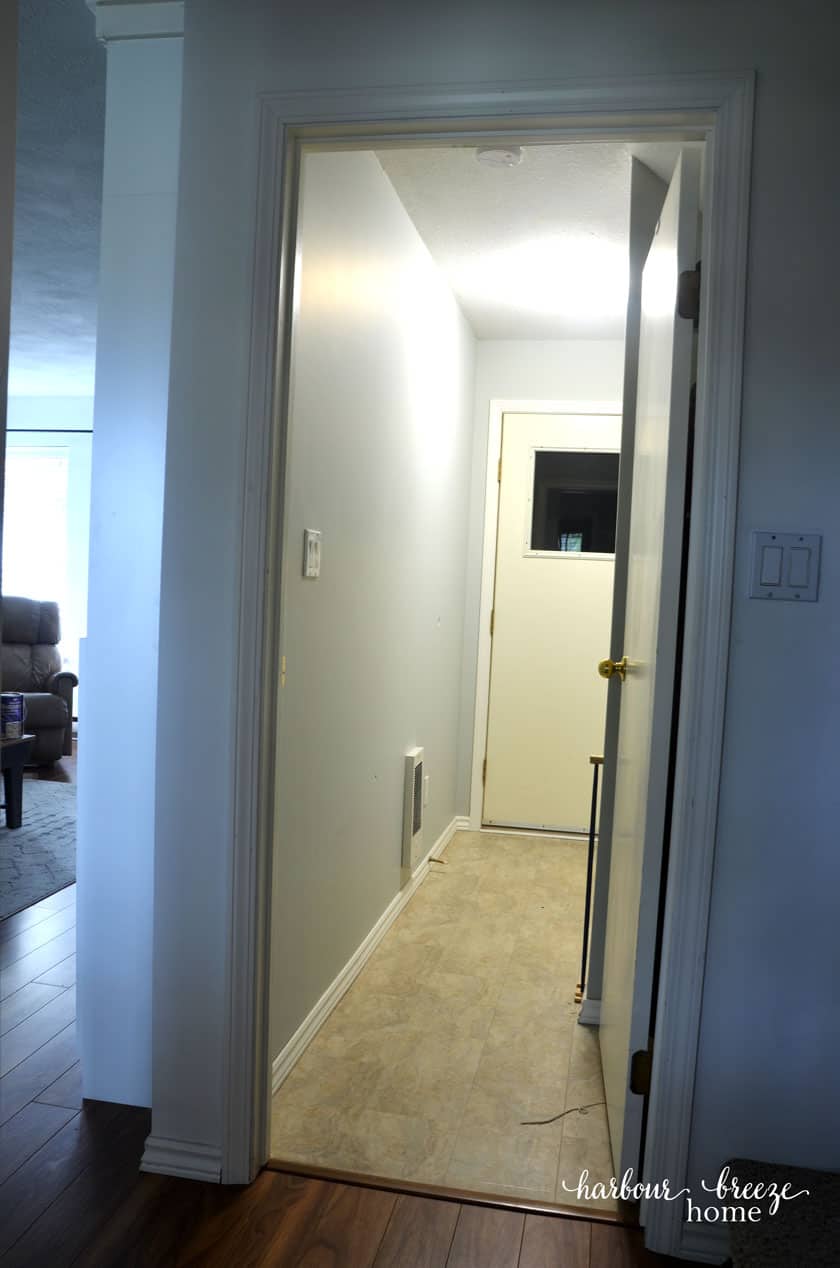
If you walk out the door the door at the end, you’d find yourself in the garage.
Or, if you’d turn to the right, you’d find the laundry area with a teeny tiny powder room at the end.
“Problems” that needed attention:
- Although I loved the blue color of the wall paint in our previous house, somehow it just didn’t work well in this space. I wanted a lighter, brighter overall feel to the space.
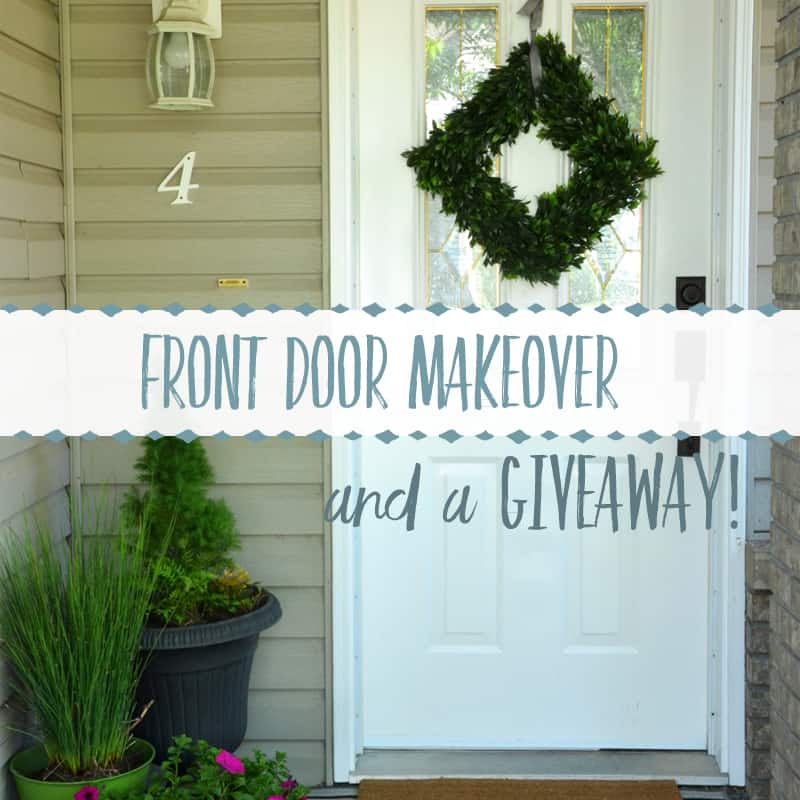
- That dreary old outside door looked dated and sad.
- The electrical box (which I need to access every time I plug the vacuum in with the portable heater on! tee hee…) is in an incredibly awkward space…and is a terrible eyesore.
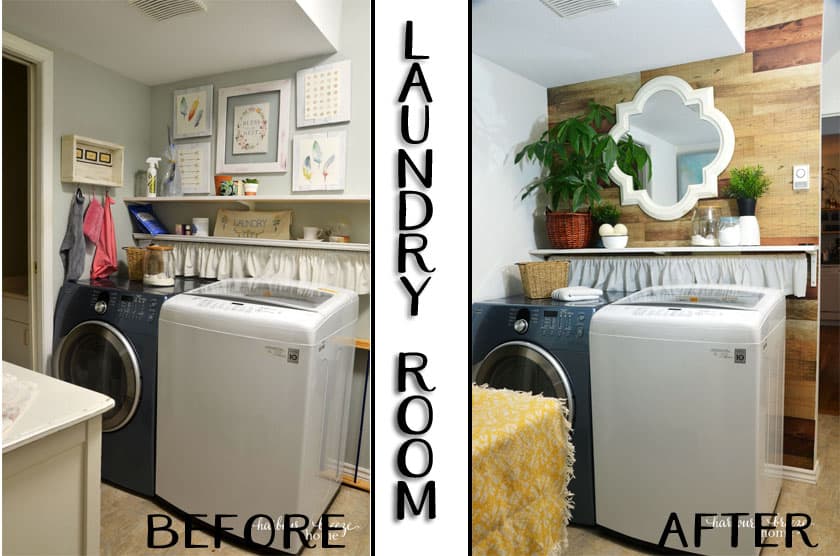
- The shelves above the washer and dryer were not necessary for storage. I wanted to do something different and fresh there.
Come see the Laundry Room makeover after!
Here is what we did:
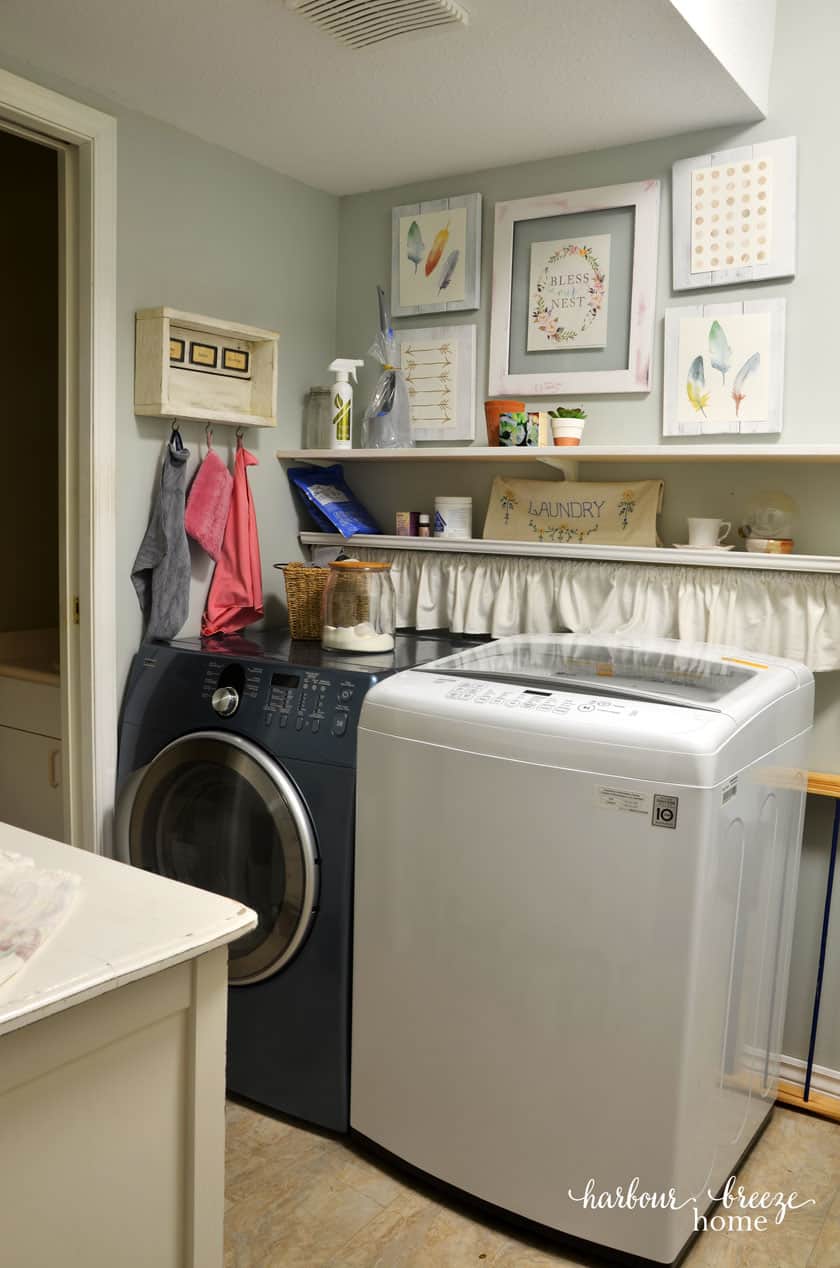
1. The Walls & Trim – Simply White by Benjamin Moore
Since I had fallen in love with the color Simply White for the rest of our house, my first goal was to paint the walls that color, too. Little by little, we’re changing all the rooms to this color. It just works for this house and we love it.
Here’s something to note when painting your walls a white color – it will take a LOT of coats of paint to cover whatever color is underneath. After using 4 different brands of paint (all color tinted to Benjamin Moore’s Simply White color), I can say that no one paint brand or type covers better than the others. This particular brand is Cloverdale, and I love the finish it is. But, like all the other brands I’ve used, I had to cut in and roll on 3 coats – and 4 coats in certain areas. That is NOT the paint’s fault- just a reality of painting a really light color on walls. And, bonus, your leg muscles will get a good workout with all those trips up and down the ladder!;)
Related Articles: How to Paint a Room and Painting Supply Checklist – Everything You Need to Paint a Room
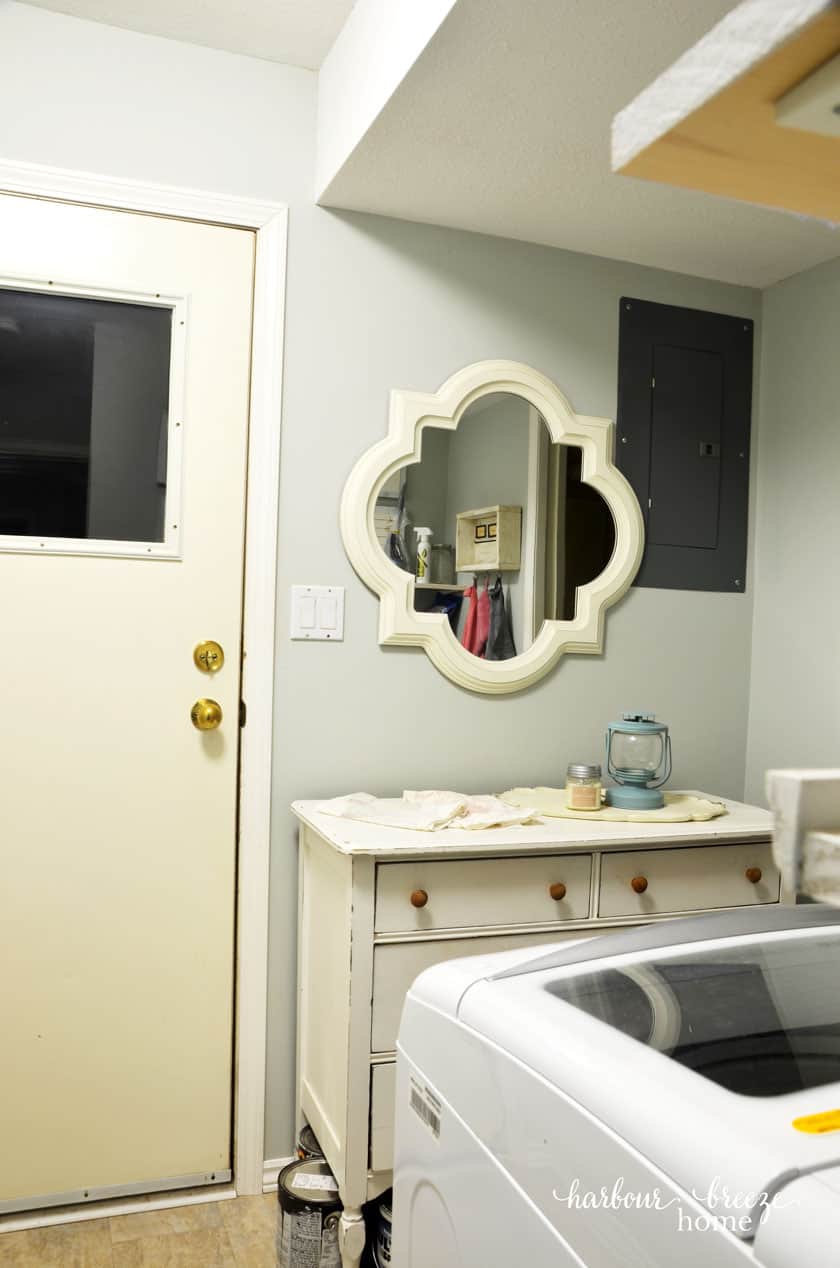
2.The Exterior Door – Raccoon Fur by Benjamin Moore
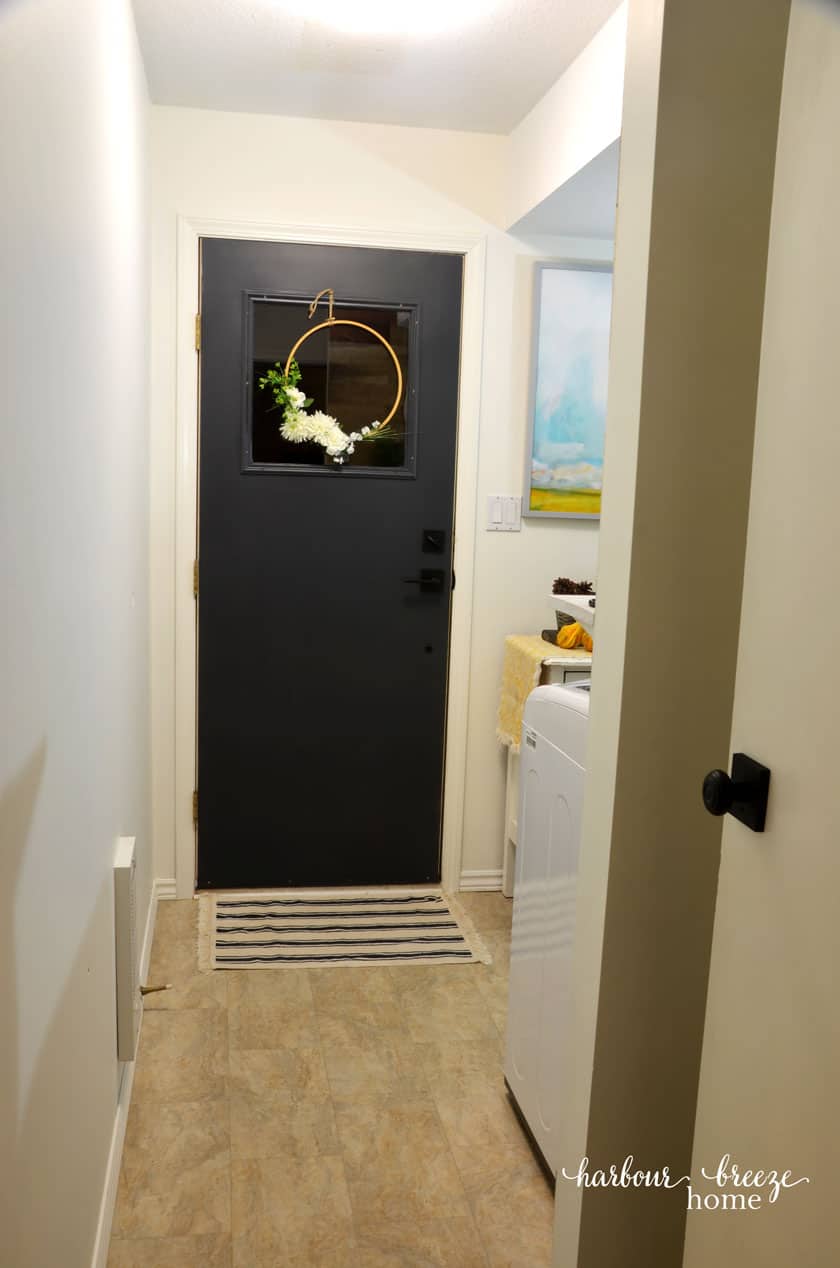
I landed on the color “Raccoon Fur” by Benjamin Moore when I tried to color match our new couch with a paint color. I previously painted our other 2 exterior doors with it, so it seemed fitting to paint this one to match. Its gray/black/blue color seems “soft” to me, and fits with the Modern Farmhouse Style I love so much.
If you are wanting to paint your own metal exterior door with plastic trim, I did a detailed tutorial on that process here. And, I admit, I referred to it myself when I was trying to figure out which primer to use.;)
3.Door Handles by Schlage
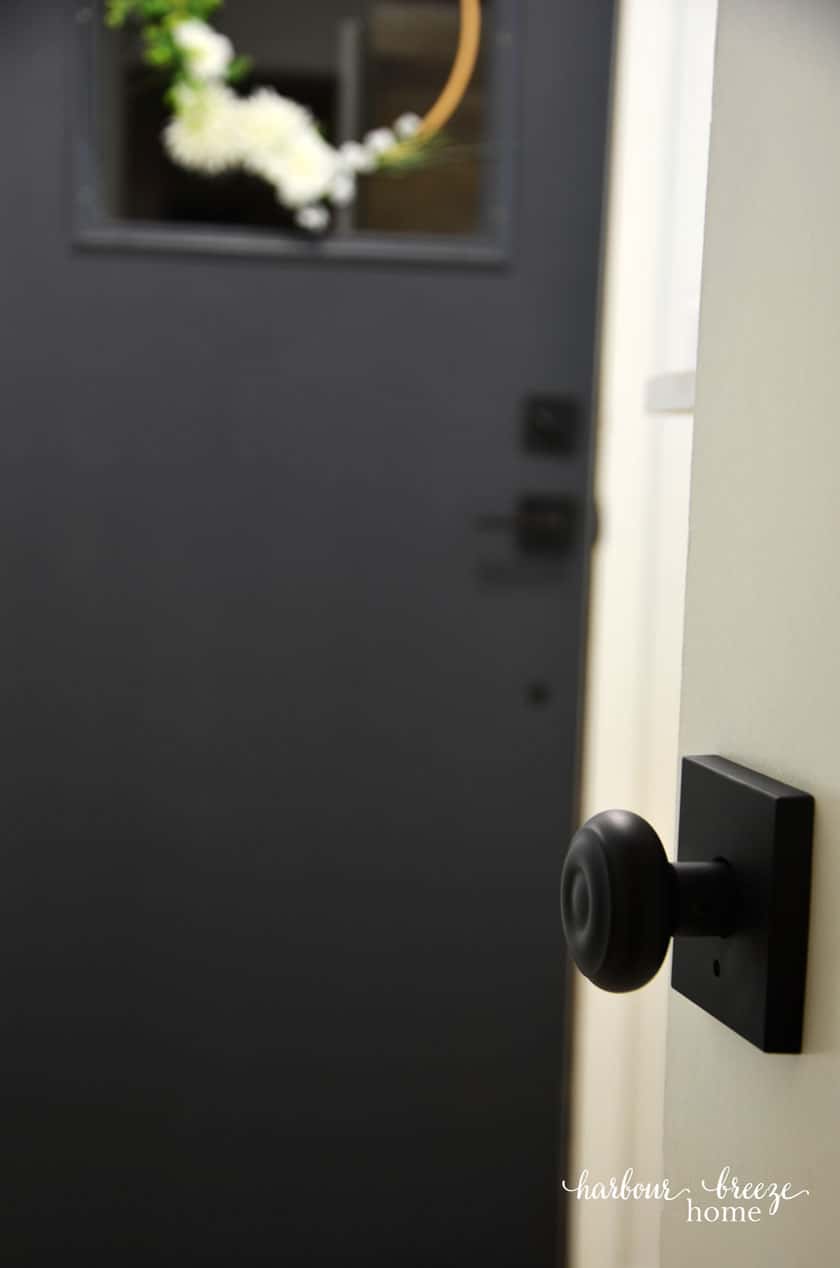
I can’t tell you what a difference just changing out the door hardware does for a space. Suddenly, the room gets taken out of the dated 80s, and instantly into the right decade again.:)
I chose handles that were a match to those I used for our Farmhouse Hallway Makeover a few months ago, and love how it all ties together now. The hallway door is the Georgian Knob with Collins Trim and I chose the Georgian Lever with Collins Trim with deadbolt for the exterior door. (This one is very similar.) I love its modern twist with the oil rubbed bronze finish.
(Be sure to head on over to my Instagram channel for a chance to win some pretty new door handles for your own room makeover!)
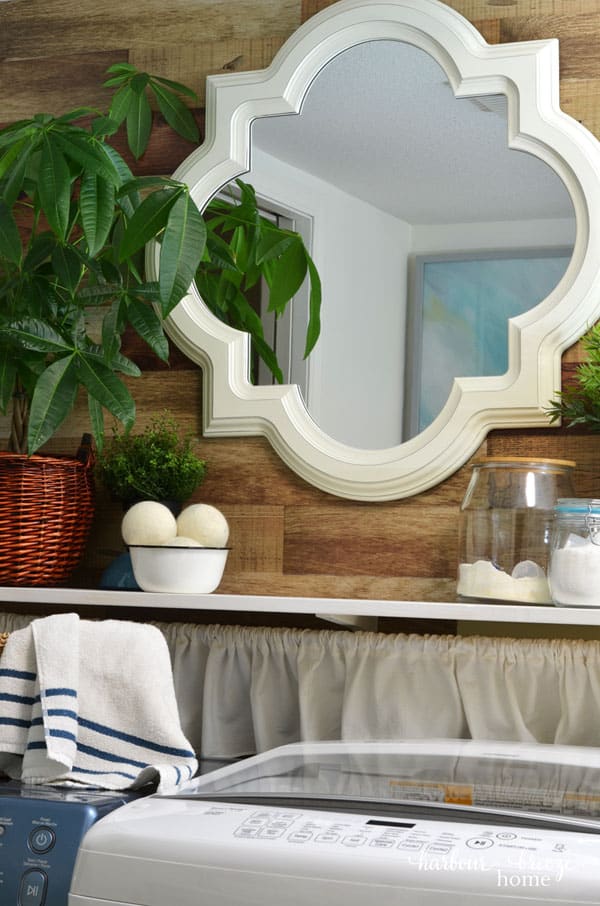
4.Feature Wood Wall
I’d like to say that I had this entire makeover planned out ahead of time with mood boards and carefully selected materials.
But, I didn’t.
All I knew for sure was the paint colors. Once they were done, I headed into our local Dollarama to see if I could find some inspiration for a feature wall.
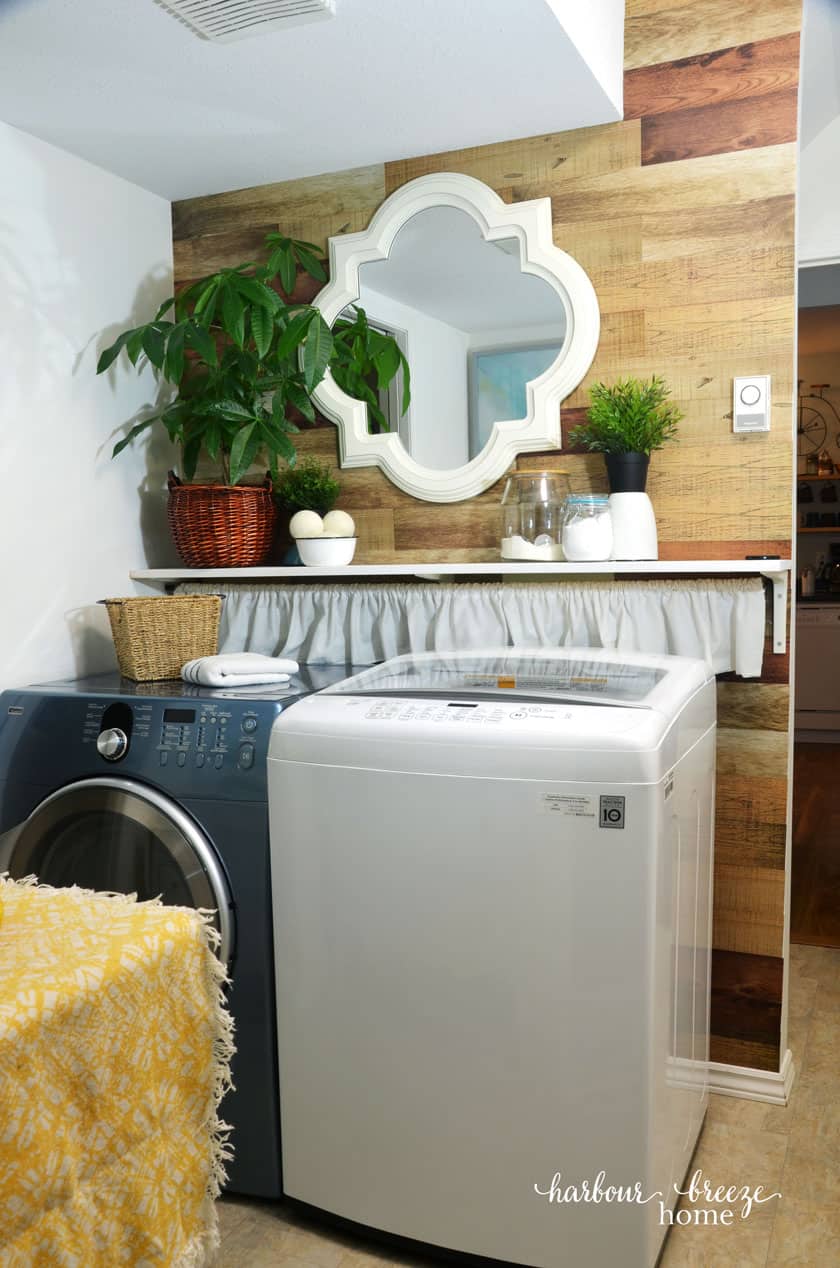
I found it in the form of wood plank stickers. For only $3 for a package of 8 planks, this wall turned out to be an incredibly fun and budget friendly transformation!
**Many people are asking where to purchase these wood plank wall stickers. These are the closest things I can find online.

5.Electrical Panel Cover Up
I really agonized over this corner – trying to come up with a stylish solution to cover up the electrical panel. In the end, the answer was just in another room!
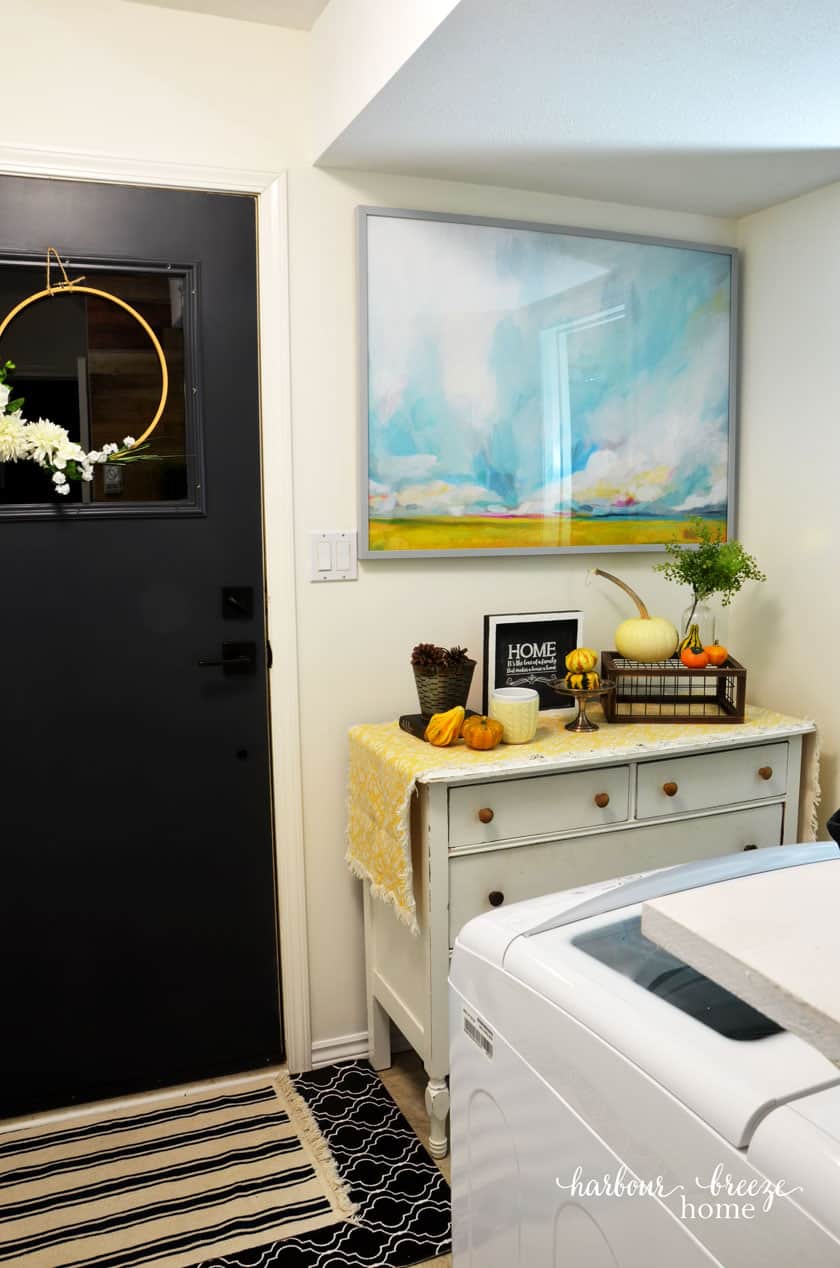
I grabbed this beautiful print from Minted and held it up in the space. I love how it injects such beautiful, happy colors into the space, and ties in with the blue dryer across from it.
Related Article: How to Use Photoshop to Help Choose Minted Art
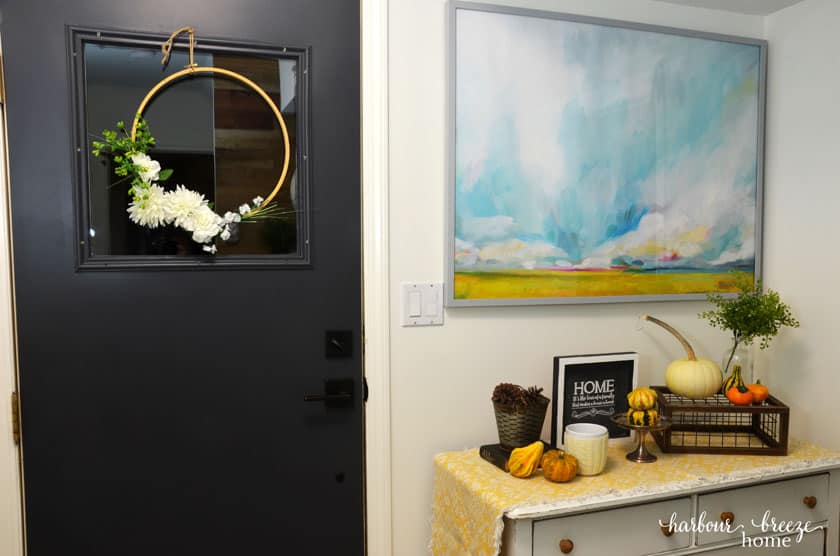
Since I had to hang it so high to cover the electrical box, I built up the display on the dresser to be a little higher than normal. It helps compensate for having the art hung at a level that I would normally consider to be WAY too high!!
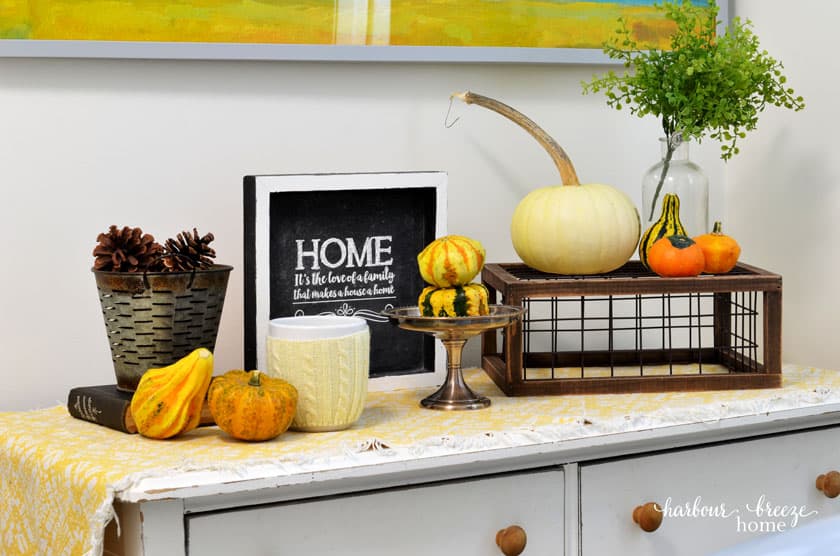
Decor, Accessories, & Practical Storage
After living in this home for a few years now, I’ve finally realized what essentials are needed in my laundry space. Initially, I thought I would need shelves for storage.
However, after I switched all my cleaning systems over to Norwex, I find I no longer need baskets and bins full of cleaning supplies (with harmful chemicals!).
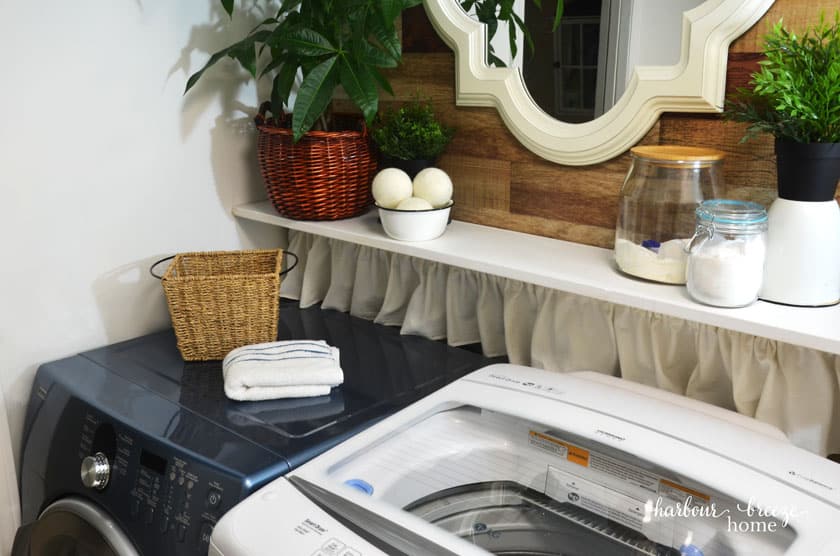
That allows me then to put what I actually use on a daily basis out in pretty containers and add decor to make it look even nicer!
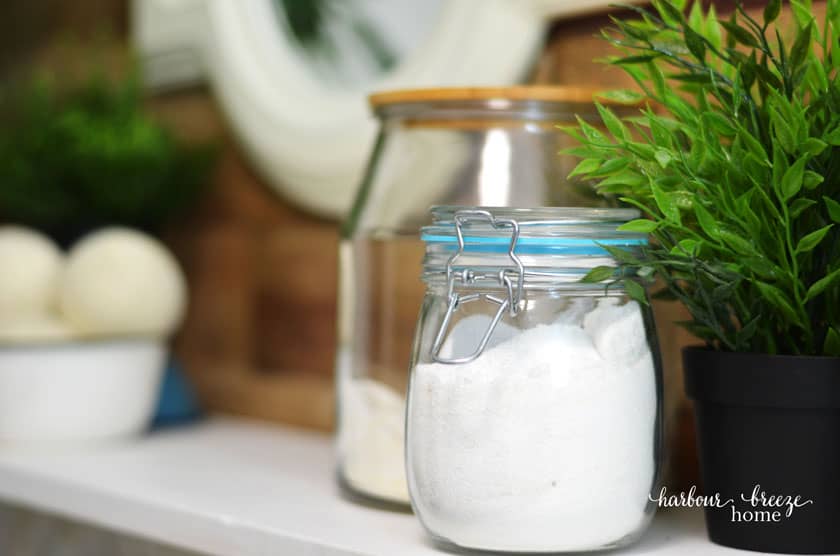
Here are my laundry essentials:
- Laundry detergent in a large jar. (I got mine at Ikea.).
- Microfiber booster in a small jar. (I got mine at Dollarama.).
- Dryer balls with Purification essential oil
- Basket for odd socks. (Where do those socks go anyway?)
I added in some faux greenery plants that I purchased in Ikea, along with a Money Tree plant. I’m on the lookout for a faux version of something of similar size, as my Money Tree probably would like some actual, real light.;)
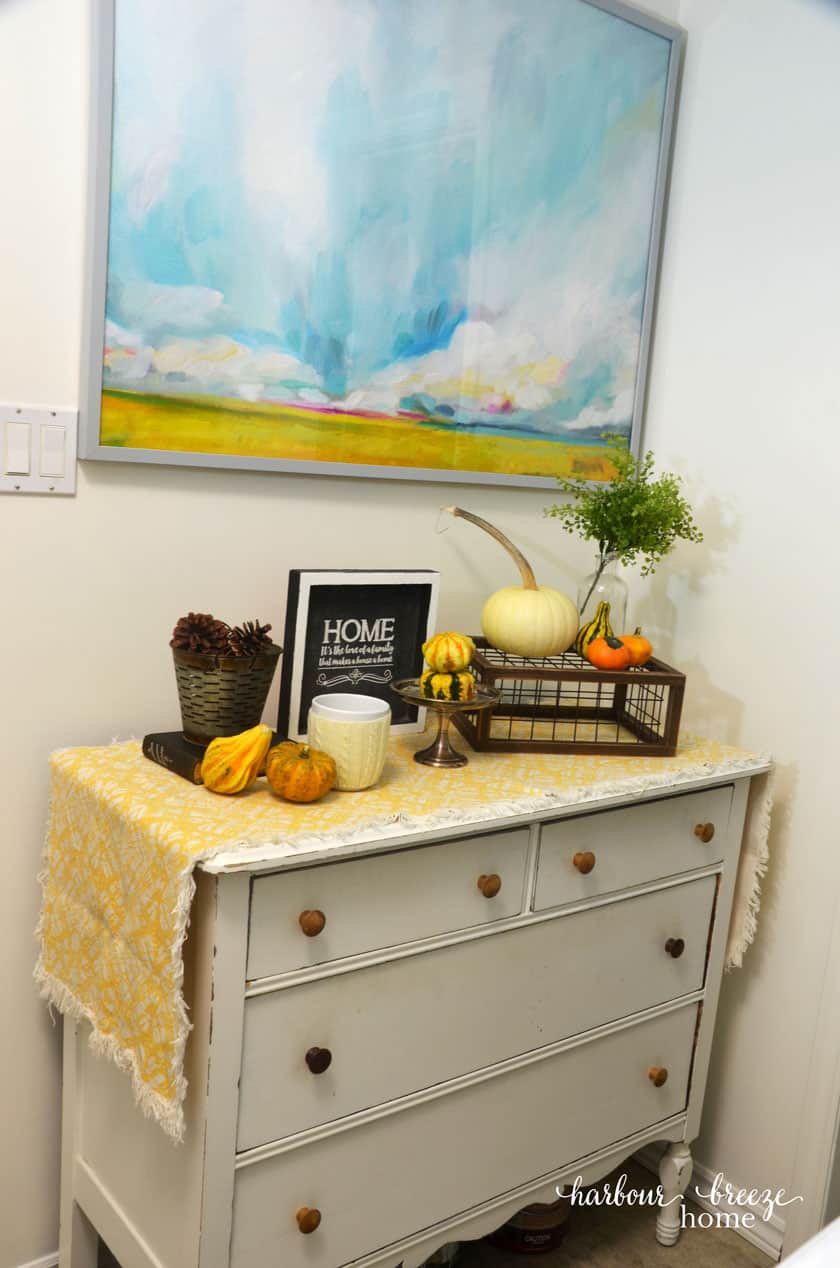
This antique dresser that I painted years ago is an essential storage unit in our small home.
Here’s what it holds:
- Small paint and stain cans in the bottom drawer
- Nails, wall anchors, batteries, flashlights, and extension cords in the middle drawer
- Cleaning cloths in the top left drawer
- My wall hanging essentials and most often used tools in the top right drawer.
- Underneath is hiding my (very edited down) house paint collection.:)
Small Changes. big impact.
So, there you have it! 2 days and a small budget did wonders for this small space!

Love your modest home redo’s. I’m always surprised at what editing out and simplifying will do. Very pretty but big difference. 💙💜
Wow! You did a great job in this space. It looks so neat and lovely. Where do the odd socks go? My mom always said they went to be with Jesus.❤️