
How to Hang A Picture on the Wall

Learn how to hang a picture on the wall the quick and easy way with this simple tip.
I watched a hilarious clip of Ellen showing “life hacks” the other day. Do you know what life hacks are? In her words, they are “tips or tricks to make your life easier”.
Well, ladies, do I ever have a life hack for you today.
It’s gonna knock your socks off!:)

The idea of this life hack came from something I saw on Pinterest (of course). However, it involved some sort of thin wood that I never had. So, I came up with my own version.
For those of you who are terrified to hang a picture on the wall for fear of putting a hole in the wrong place, this is for you!
How to Hang Pictures on the Wall
{the easiest way EVER!}

Supplies Needed to Hang a Picture or Painting on the Wall
- a picture with a saw-tooth hanger;
- a thumbtack
- a strip of thick paper like cardstock or cereal box cardboard
- a small nail
- a hammer
The Simple Step by Step Process for Hanging Pictures
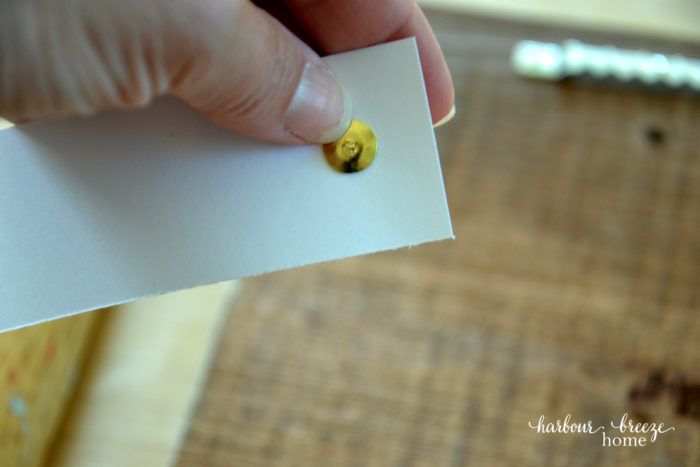
1. Insert the thumbtack near the end of the strip of thick paper.

2.Slip the paper under the saw-tooth hanger.

3.Position the thumbtack in the center of the saw-tooth hanger.

4. Holding the paper strip firmly around the front, position the picture where you’d like it to hang on the wall.

5. Once in position, push the picture firmly against the wall.

The thumbtack will leave a tiny hole to mark exactly where the nail should go!
6. Hammer the nail into the hole left by the thumbtack.

7. Hang the picture on the nail.

8. Stand back and congratulate yourself. You did it!:)
More tips on how to hang pictures on drywall:
- How to Hang a Picture with 2 Hangers in Drywall
- How to Hang a Gallery Wall Above a Couch by Yourself!
- How to hang a large canvas on the wall
- How to hang heavy objects on the wall

For more recipes, crafts & ideas for your home all year round, become a VIP!
Become a VIP newsletter subscriber and get instant access to the library of free printables (including wall art, gift tags, and more!). Click here or the button below to join today.

Original publish date July 6, 2016. Updated with additional information since then.

Thank you soo much for sharing informative post
This is such a practical solution! I’ve always hesitated to hang pictures because I worry about getting the placement wrong. Your thumbtack method is genius—it takes away that anxiety of drilling holes in the wrong spot. I really appreciate that you adapted the original Pinterest idea to use materials most people already have at home. That’s the kind of creative problem-solving that makes DIY projects actually doable. Definitely trying this over the weekend!