
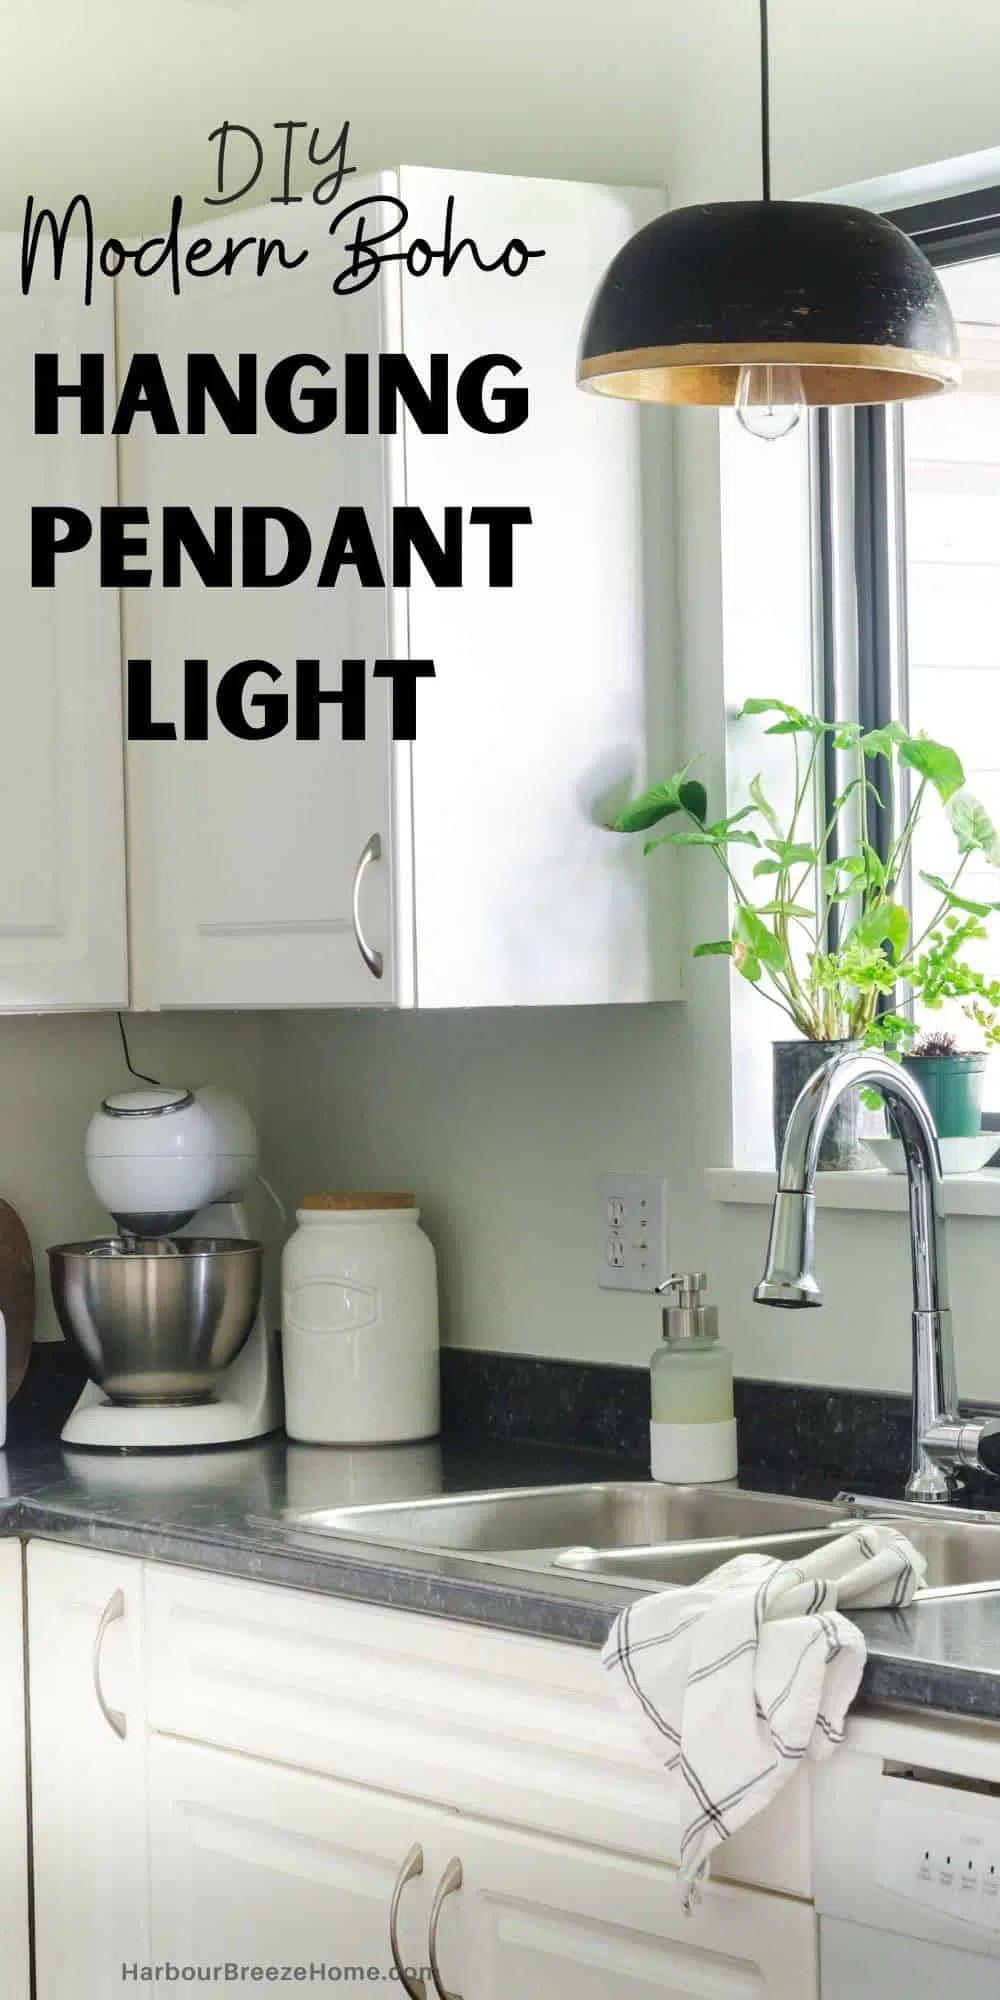
How to Make a DIY Kitchen Pendant Light out of a Bowl

Learn how to turn an ordinary black wood bowl into a stunning Modern DIY kitchen pendant light fixture using simple tools.
I’ve been on a mission to spiff up my little kitchen. So far, we’ve brightened up the space with a new paint color and new above and under kitchen cabinet lights.
Once those things were done, I turned my attention to the window above the kitchen sink. It seemed a little sad and boring. I envisioned a pretty black kitchen pendant light over the sink, but I just couldn’t find what I wanted at any of our local stores.
So, with the help of my handy husband, we turned a black wooden bowl into our own custom kitchen pendant light!
DIY Kitchen Pendant Light Tutorial
Disclosure: Affiliate links are included for your shopping convenience.
Supplies you’ll need:
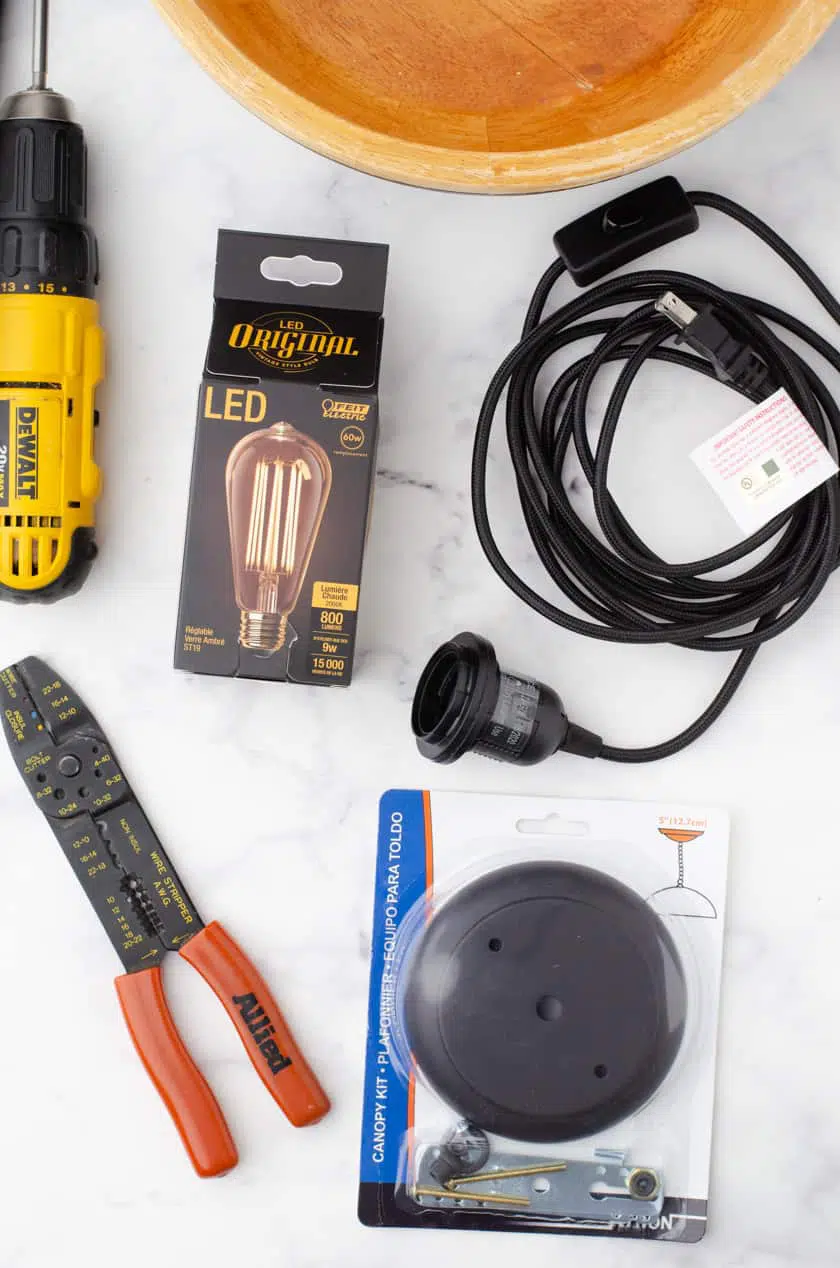
The actual steps to making this hanging light fixture are quite easy – once you have the proper supplies. We had to do some hunting, but finally found everything we needed in our local stores. Here’s what you’ll need. (I’ve linked similar items to what we used to Amazon links):
- 12″ wooden bowl (I had this one sitting around. Look for them at garage sales or thrift stores. I also found similar wooden bowls like this one and this one at Target.)
- Drill
- Hanging pendant light kit with wrapped cord (The set linked already has the canopy kit included!)
- Black Canopy kit
- Strain Relief Connector
- Vintage Edison Style Light Bulb
- Electrical wire stripping tool
- Electrical voltage tester pen
How to assemble a DIY Pendant Light
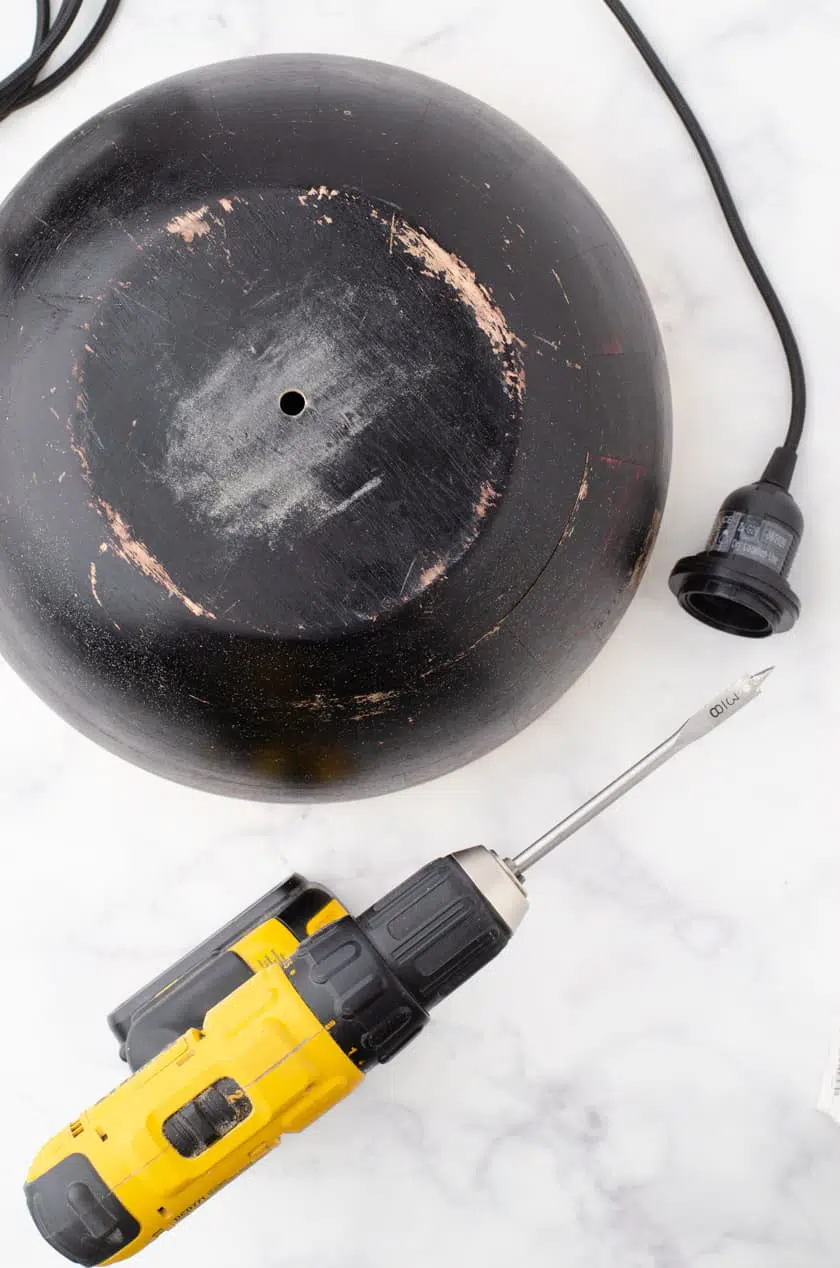
Step 1: Drill a hole in the center of the bottom of the wooden bowl big enough to accommodate the size of the cord.
It might be a bit tricky to find the perfect center of the bowl. We used a protractor to help us determine a center point.
If you are in doubt of the size of drill bit to use, start out small and go bigger if you need.
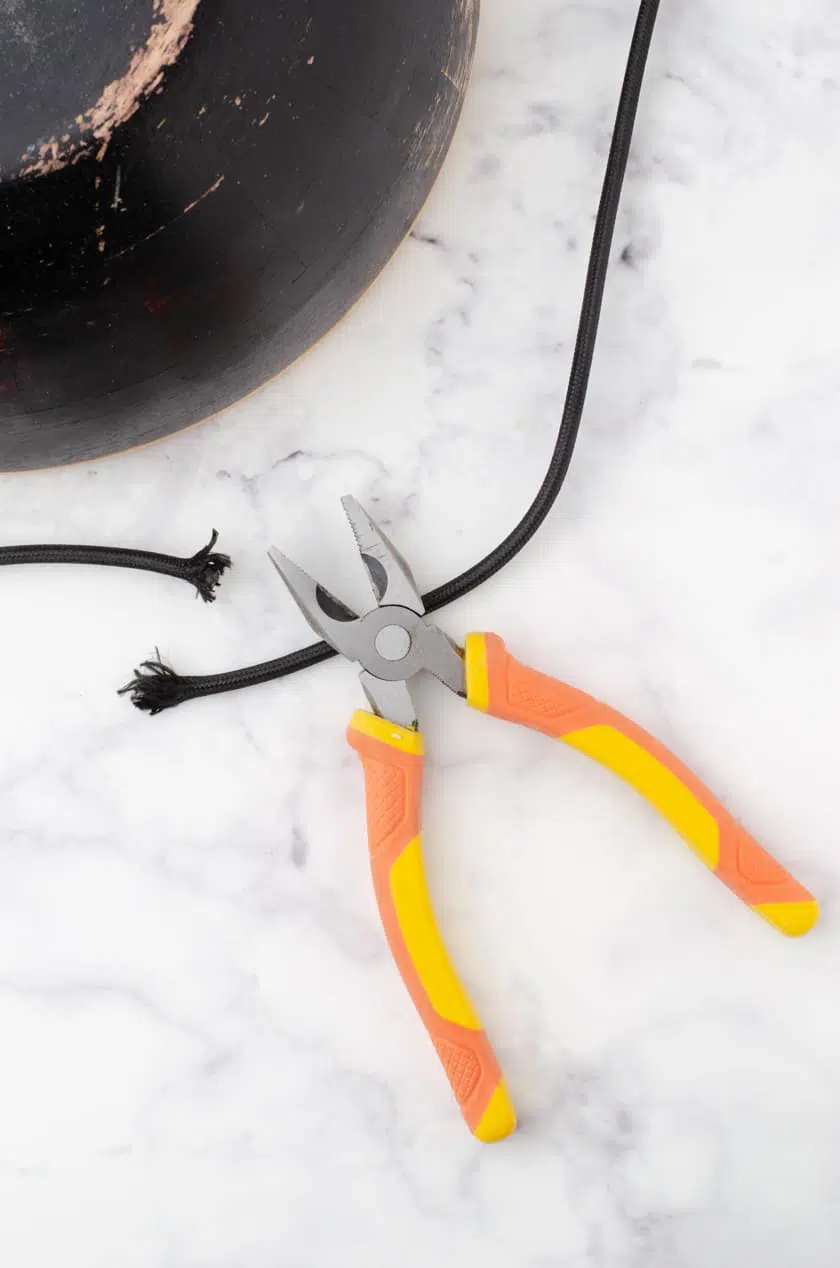
Step 2: Cut the hanging pendant light cord about 4-6 inches longer than you want the light to hang down.
Again, it’s always better to start out too long than too short!

Step 3: Thread the corded wire through the bowl so the socket is facing down inside the bowl.
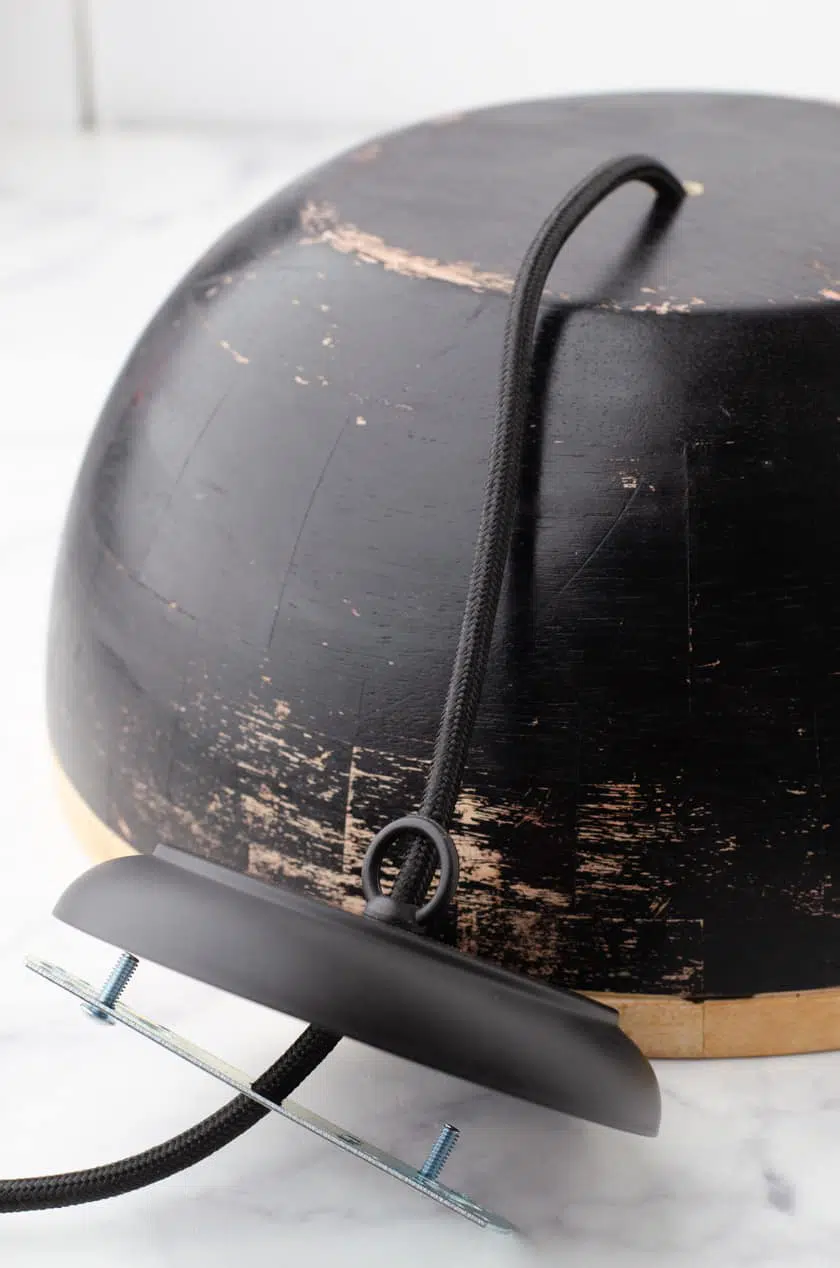
Step 4: Insert the corded wire through the hole in the bottom of the ceiling canopy.
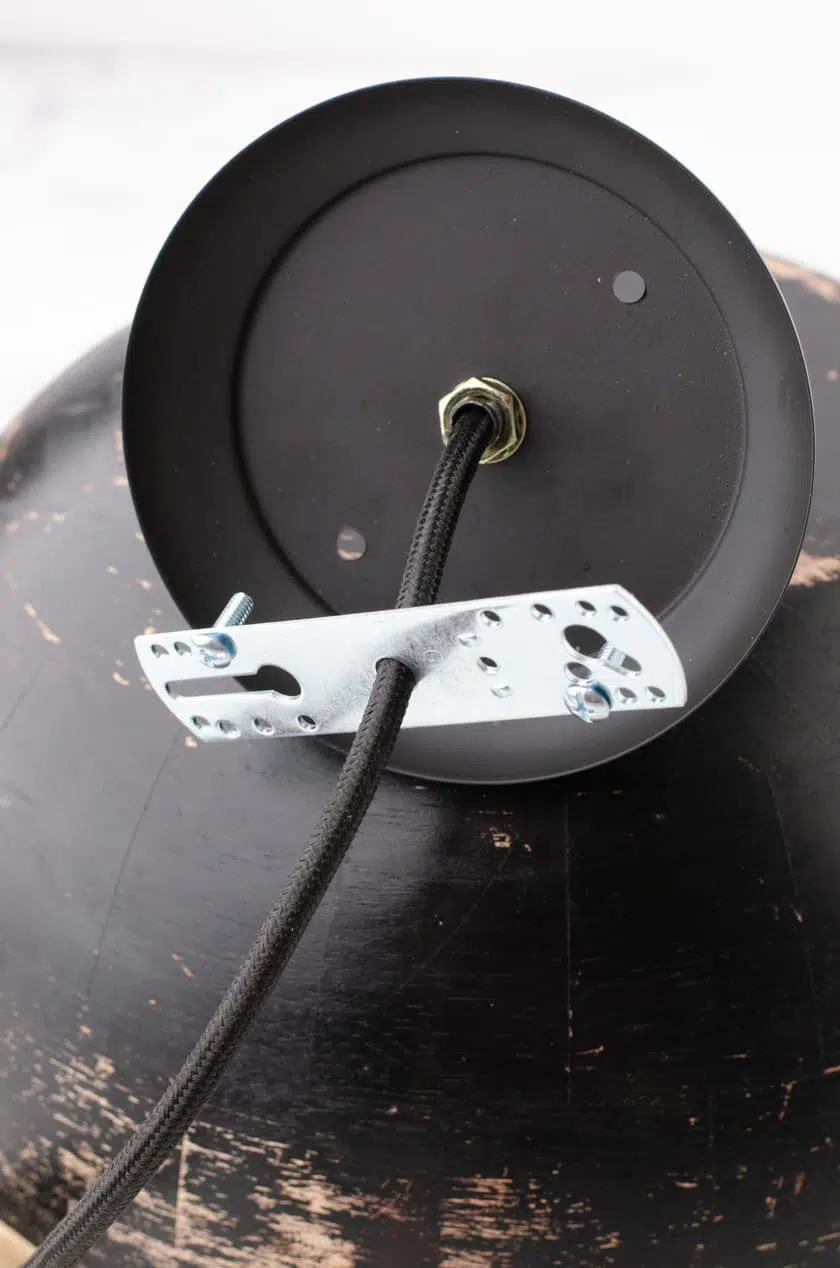
Step 5: Following the directions on the back of the canopy kit box, place all the hardware in the correct locations.
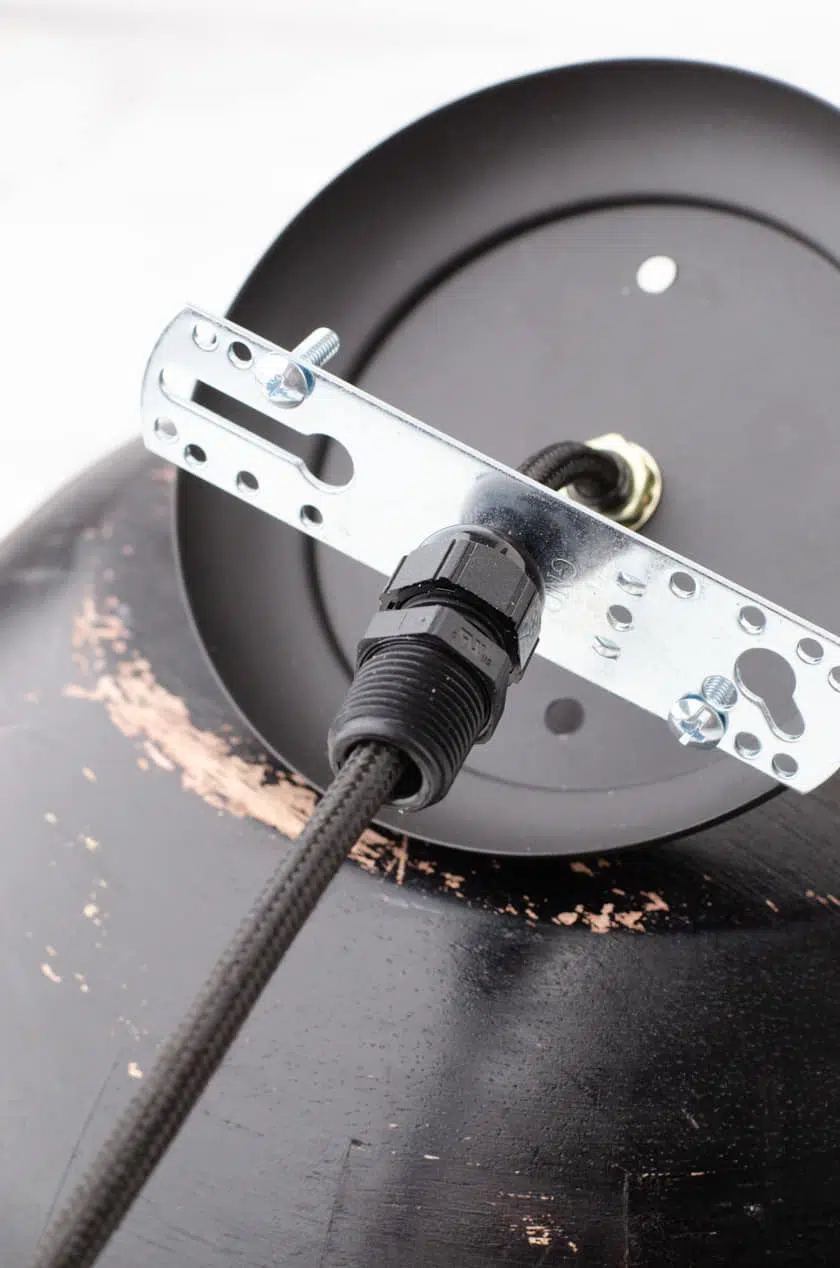
Step 6: Attach the strain relief connector above the canopy kit bar.
This is a crucial hardware piece for this hanging light fixture set, as it is what holds the weight of the fixture. We had a hard time finding it locally. It is actually a bit larger than we preferred, but it worked ok for our application. We just made sure to screw it on really tight so it would hold everything securely.
Now, the light is all assembled and it’s time to hardwire it to your light fixture.
How to hardwire a kitchen pendant light
Although I tried to get pictures of these steps, they did not turn out well! So, instead, I’ll share a helpful YouTube video of a very thorough step by step tutorial of how to hardwire a pendant light:
- Locate circuit breakers and turn off the circuit to the light fixture you’ll be working with.
- Take off existing light fixture.
- Pull down the wires
- Turn breaker back on and using an electrical tester, confirm which wire is hot and which one is not. (Usually the black is hot and the white is not. But, it’s best to double check!)
- TURN BREAKER BACK OFF!
- Screw on the mounting bracket.
- Using electrical wire strippers, strip the ends of the pendant light cord to reveal the wires.
- Attach the hot wire to the hot wire in the ceiling. Attach the not hire wire to the not hot wire in the ceiling. (Again, typically black is hot and white is not.) Screw on the caps of each.
- Screw on the ceiling canopy.
- Put the light bulb in.
- Turn on the breaker and turn on your pretty new light.
How high should you hang a kitchen sink pendant light?
I wasn’t sure myself, so research told me that they are usually hung 12-20 inches below an 8 foot ceiling, or have a 30-36 inch clearance above the countertop.
That seemed to give a wide range of options, so I just eyed the location I liked. Ours is 37 inches above the countertop and hangs down 23 inches from our 8 foot ceiling.
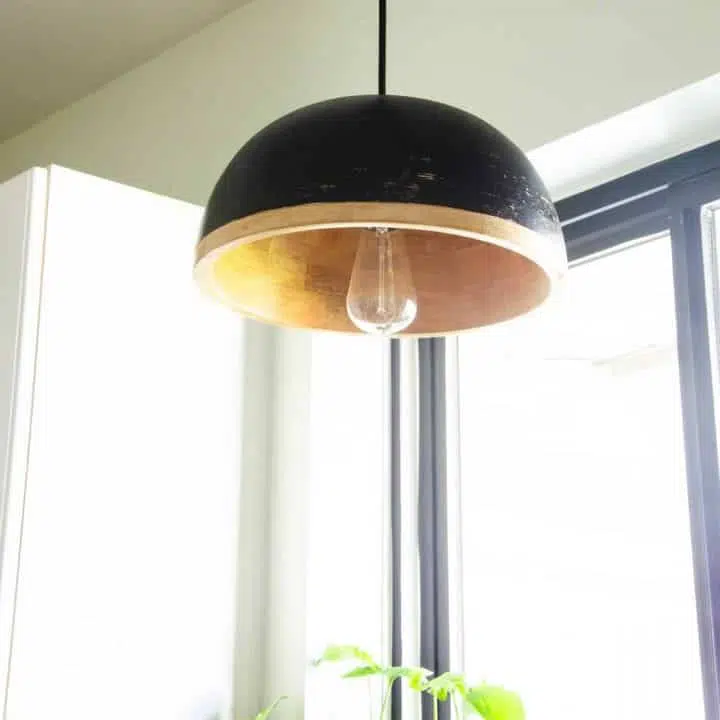
The kitchen sink pendant light is up!
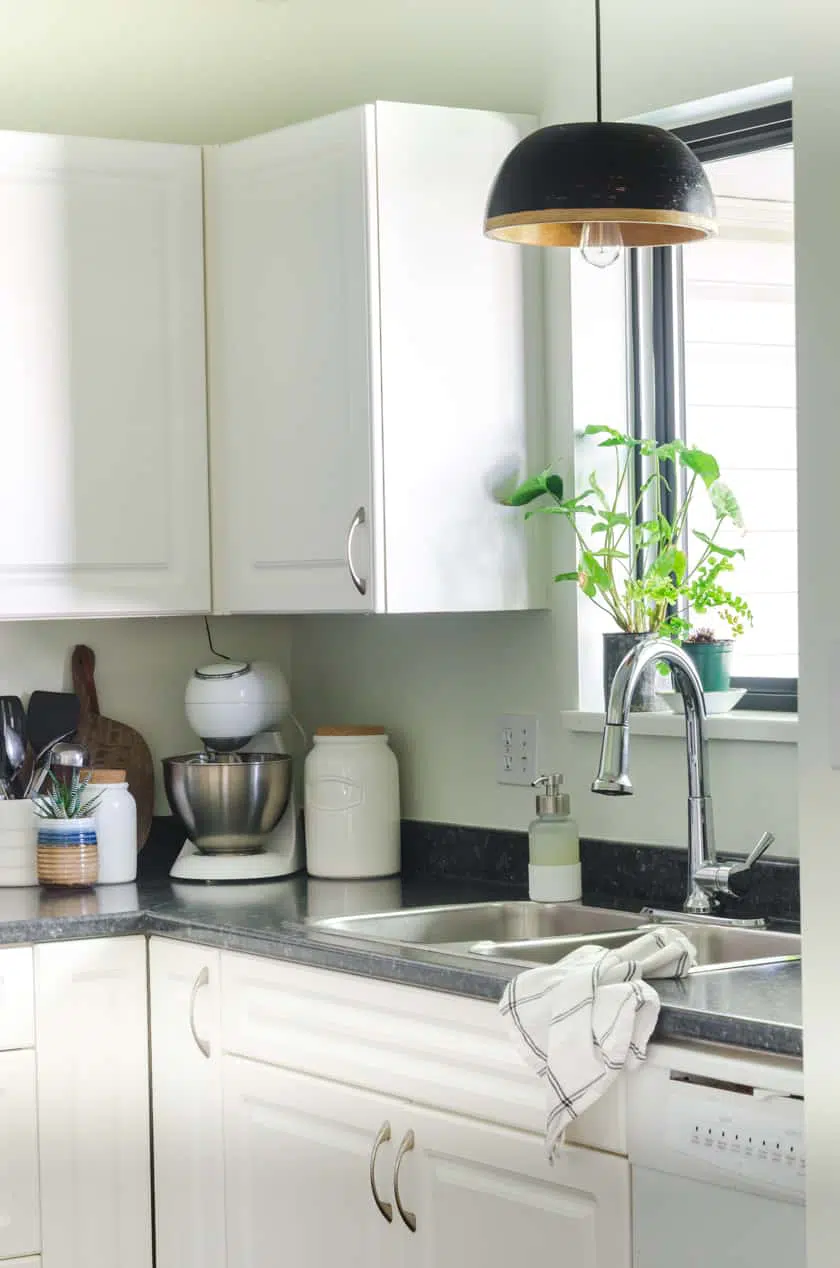
I just love having a Modern Cottage pendant light above the sink.
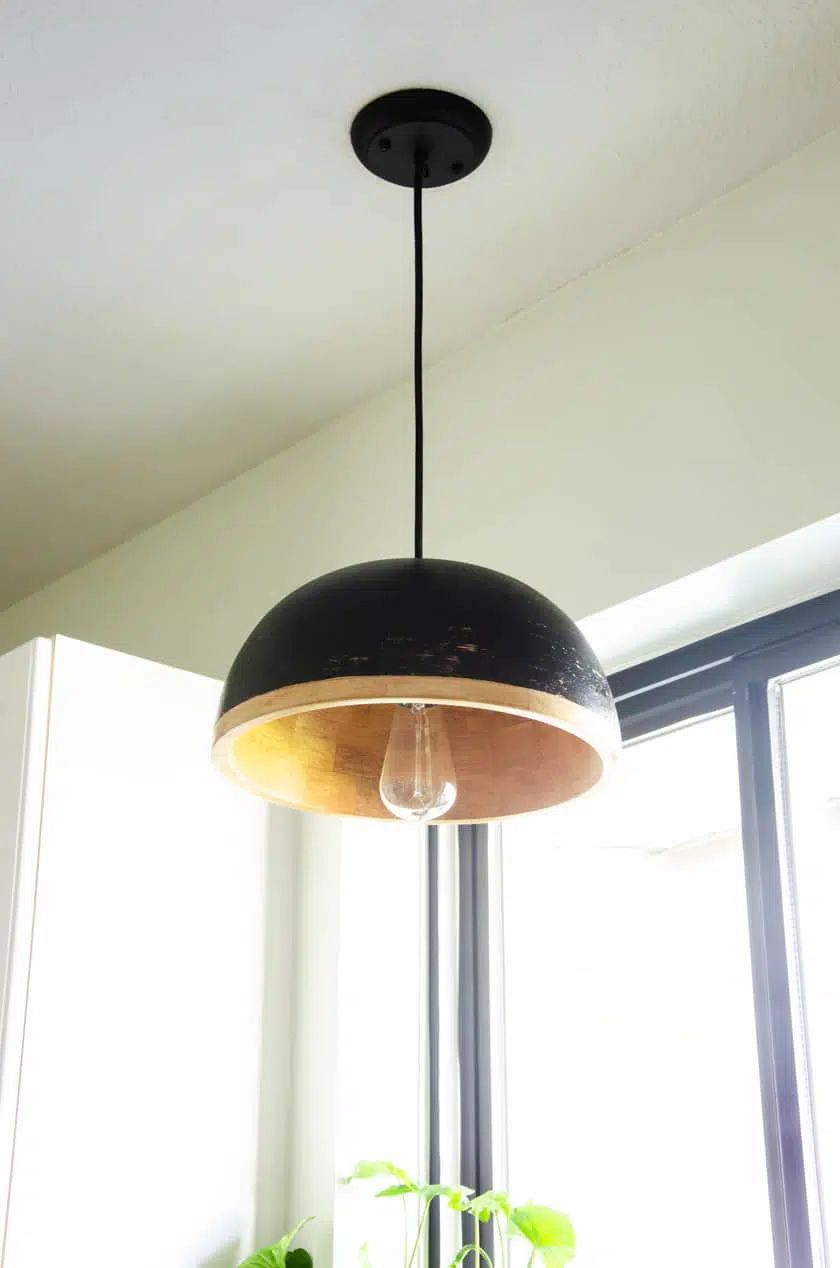
It adds so much character to the space – and we saved a ton of money making it ourselves!
For more DIY home decor projects, you might want to check out these popular ones:
- DIY farmhouse shelves inspired by Joanna Gaines and the Fixer Upper show.
- DIY floating shelves using a board and dowels
- Floating frame for canvas prints
- Easy large diy picture frame for posters and large art
- 5 DIY indoor house plant planter stands
How to Make a DIY Kitchen Pendant Light out of a Bowl
Learn how to turn an ordinary black wood bowl into a stunning Modern DIY kitchen pendant light fixture using simple tools.
Ingredients
- 12 ″ wooden bowl
- Hanging pendant light kit
- Black Canopy kit
- Strain Relief Connector
- Vintage Edison Style Light Bulb
Instructions
- HOW TO ASSEMBLE A DIY KITCHEN PENDANT LIGHT OUT OF A BOWLStep 1: Drill a hole in the center of the bottom of the wooden bowl big enough to accommodate the size of the cord.
- Step 2: Cut the hanging pendant light cord about 4-6 inches longer than you want the light to hang down.
- Step 3: Thread the corded wire through the bowl so the socket is facing down inside the bowl.
- Step 4: Insert the corded wire through the hole in the bottom of the ceiling canopy.
- Step 5: Following the directions on the back of the canopy kit box, place all the hardware in the correct locations.
- Step 6: Attach the strain relief connector above the canopy kit bar.
- HOW TO HARDWIRE A KITCHEN PENDANT LIGHT
- Locate circuit breakers and turn off the circuit to the light fixture you’ll be working with.
- Take off existing light fixture.
- Pull down the wires
- Turn breaker back on and using an electrical tester, confirm which wire is hot and which one is not. (Usually the black is hot and the white is not. But, it’s best to double check!)
- TURN BREAKER BACK OFF!
- Screw on the mounting bracket.
- Using electrical wire strippers, strip the ends of the pendant light cord to reveal the wires.
- Attach the hot wire to the hot wire in the ceiling. Attach the not hire wire to the not hot wire in the ceiling. (Again, typically black is hot and white is not.) Screw on the caps of each.
- Screw on the ceiling canopy.
- Put the light bulb in.
- Turn on the breaker and turn on your pretty new light.
Notes
Refer to the blog post for a helpful video for steps on how to hardwire a kitchen pendant light.
Be sure to check out all the specific specifications of products before you buy them to ensure you get the right product for your specific space.
Nutrition Information:
Yield: 1 Serving Size: 1 gramsAmount Per Serving: Unsaturated Fat: 0g
For more inspiration and ideas for your home:
Be sure to join the VIP newsletter list! As a valued VIP member, you will get exclusive access to the entire library of free printables – including wall art, cards, organization lists, menu planning set, and more.
Click here or the button below to join today.

And if you want to see more real life behind the scenes action, be sure to come join me on my @harbourbreeze Instagram Channel!

This is such a creative idea! I love the simple elegance of using a bowl for a pendant light. Can’t wait to try this out in my kitchen. Thanks for the inspiration!