
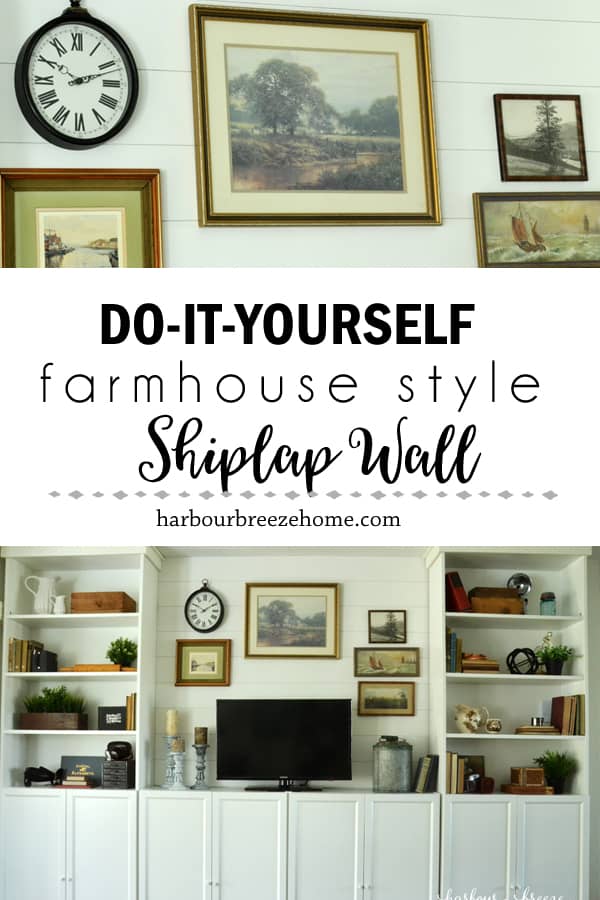
How to Make a Faux Shiplap Wall
Add a touch of farmhouse style with this easy & inexpensive way to make a DIY faux shiplap wall using plywood cut into strips.
How to Make a DIY Faux Farmhouse Shiplap Wall from Plywood
I’ve been admiring shiplap walls ever since Joanna Gaines taught me what they were on an episode of Fixer Upper.
I’ve been pinning them on my Pinterest boards and wondering if one day I could somehow do one myself.
That day finally arrived last week.
After plotting and pondering for months on end, the project actually took less than 30 minutes to complete .Go figure!:)
There are tons of shiplap tutorials out in web land. I know, because I’ve read a ton of them myself.
I combined everything I learned from them, and modified the process to fit into our particular scenario.
Supplies Needed for farmhouse shiplap wall:
Disclosure: This post contains affiliate links for your shopping convenience.
- 1/4 inch mahongany veneer plywood (Our project required one sheet.)
- Paint (I used “Simply White” by Benjamin Moore in an eggshell finish)
- 4 inch foam roller and roller tray
- stud finder
- A straight edge (like a long level) to draw long lines on the wall with a pencil
- Pennies for spaces
- Pneumatic nailer
- Dap Alex Fast Dry Acrylic Latex Caulk Plus Silicone
The Step by step Process for Farmhouse Shiplap Walls
- Measure the wall space you’d like to cover in shiplap. Determine the width and length of the boards you’ll need.

We knew that we wanted to shiplap only the portion of wall in between the 2 tall portions of our Ikea Billy Bookcase system. After doing all the calculations, we decided to make our boards 5 1/2 inches wide.
- Purchase the plywood needed for the space you’ll be covering.
To make purchasing easier, we then drew the cuts out on a sheet of paper and went to our local Windsor Plywood store to get the wood. It helped them understand what we were doing so they could help us make the right purchase.

We discovered that the 1/4 inch plywood underlay that many other bloggers recommend wasn’t available here. So, we chose this 1/4 inch mahogany veneer plywood. In actuality, it is thinner than 1/4 inch, but it ended up working just fine.
- If you don’t have the proper saw to cut down the plywood, have a local shop cut the plywood into strips the width you want.
Since we don’t have a saw that can rip down a sheet of plywood, we discussed the dimensions of the boards we needed and had the staff at Windsor Plywood cut them for us. (That’s when the jotted down cut lines on paper comes in very handy in the communication department!)

We have found the staff there to be super helpful when we need to have plywood cut. They do a wonderful, precise job, and it doesn’t cost a fortune.
- Paint the edges and fronts of the boards.

I’ve learned the hard way that there is no way you can get the edges painted well once the shiplap is attached to the wall. (See our closet door project here.)
But, here’s where I made a big mistake…

I spent time carefully priming and painting each board, and couldn’t understand why the wood grain kept showing through…
My husband informed me I had painted the WRONG side!
So, don’t do what I did and try to paint the “mahogany” side. Paint 2 coats on the other side (no primer needed), and you’re good to go.
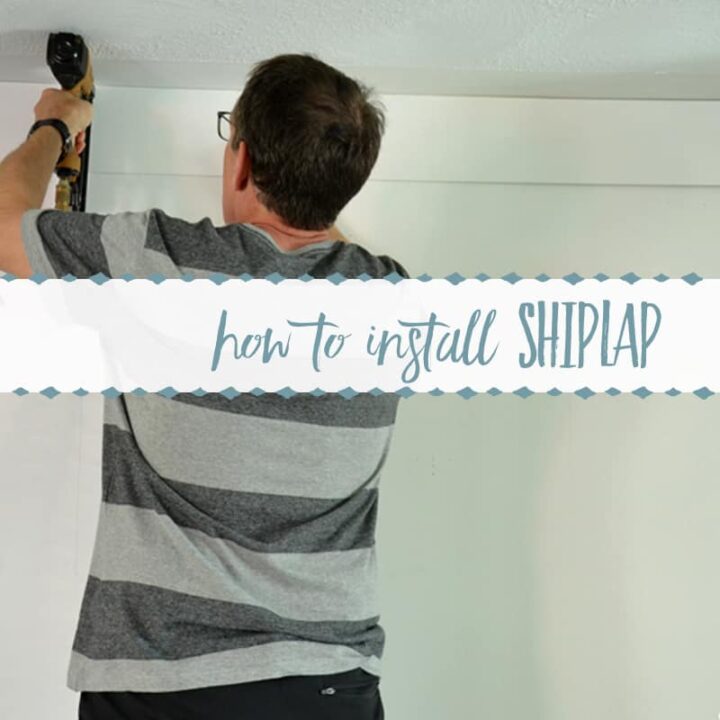
- Using a stud finder, mark out with a pencil and straight edge where the studs are on the wall you are covering.

This is where you’ll nail the boards on.
- Once the paint is dry on the boards, place the first board at the top portion of the wall. Nail it on with a pneumatic nail gun using the pencil lines as guides as to where the studs are.

- Place pennies between the boards as spacers, and work your way down the wall.


- Once all the boards are attached, fill in the nail holes with Dap drywall filler and sand smooth when dry.

Don’t worry about trying to use a special tool to apply the Dap. Just use your finger.

- Paint a final coat of paint over the boards to finish the look.
And then stand back and admire the new look!
We just can’t believe what a difference a few boards make in the look and feel of our space. Here’s where it started:
And here it is now:

We love it!

To read more about the style evolution of this space, check out this post.
To see more ideas for farmhouse shiplap walls, check out these posts:
- Turn bi-folding closet doors into french doors with shiplap
- How to make a shiplap accent wall in bathroom
- The Evergreen Fog bathroom has a shiplap ceiling!

How to Make a Farmhouse Shiplap Accent Wall
Add a touch of farmhouse style with this easy & inexpensive way to make a DIY farmhouse faux shiplap wall using plywood cut into strips.
Materials
- 1/4 inch mahongany veneer plywood (Our project required one sheet.)
- Paint (I used “Simply White” by Benjamin Moore in an eggshell finish)
- Pennies for spaces
- Pneumatic nailer
- Dap Alex Fast Dry Acrylic Latex Caulk Plus Silicone
Tools
- Stud Finder
- Pneumatic nailer
- 4 inch foam roller and roller tray
- A straight Edge (like long level) to draw long lines on the wall with a pencil
Instructions
- Measure the wall space you’d like to cover in shiplap. Determine the width and length of the boards you’ll need.
- Purchase the plywood needed for the space you’ll be covering.
- If you don’t have the proper saw to cut down the plywood, have a local shop cut the plywood into strips the width you want.
- Paint the edges and fronts of the boards.
- Using a stud finder, mark out with a pencil and straight edge where the studs are on the wall you are covering.
- Once the paint is dry on the boards, place the first board at the top portion of the wall. Nail it on with a pneumatic nail gun using the pencil lines as guides as to where the studs are.
- Place pennies between the boards as spacers, and work your way down the wall.
- Once all the boards are attached, fill in the nail holes with Dap drywall filler and sand smooth when dry.
- Paint a final coat of paint over the boards to finish the look.
Recommended Products
As an Amazon Associate and member of other affiliate programs, I earn from qualifying purchases.
-
 DEWALT Brad Nailer, Drives 18GA Finish Nails 5/8 in. to 2 in., Tool-Free Jam Release (DWFP12231)
 -
Stud Finder Wall Scanner - 5 in 1 Stud Detector with Intelligent Microprocessor Chip and HD LCD Display, Stud Sensor Beam Finders for the Center and Edge of Wood AC Wire Metal Studs Joist Pipe
-
Mister Rui-Foam Paint Roller, 4 Inch-8 Pack Paint Roller Kit, Complete 4" Mini Paint Roller Kit with Small Foam Paint Roller Covers, Frame, Tray, and Liner for Professional Painting Results
-
Dap 18128 Alex Plus Acrylic Latex Caulk Plus Silicone 5.5-Ounce - 4 Pack


Ooooo. I love the ship lap on entertainment wall. That looks beautiful and well put together. That area flows really well. Great job!