
How to Clean an Electric Coil Stovetop the Quick & Easy Way!
Say goodbye to kitchen scrubbing struggles! Today we’re spilling the beans on the quickest and easiest way to clean your electric coil stove top, making kitchen cleanup a breeze. Get ready to conquer grime with a smile as we share some friendly tips – and hidden tricks!- to keep your stove shining effortlessly.
I’ll never forget turning the corner and laying my eyes on the filthiest coil stovetop I’d ever seen.
Months of cooking mishaps had formed dark, gunky rings around the coil elements and baked in spills filled the drip pans underneath…
(Scroll to the bottom of the post to read the rest of this story.)
If you are wondering how to clean an electric stovetop, let me show you the simple steps that will help yours sparkle and shine in minutes.
The good news is, there are some sneaky features built into electric coil stovetops that make the process easy. And, I admit, the last feature is one I just learned last year – and I’m over 50 years old!!;)

1.Remove COLD coil burner. 2.Remove drip tray to clean. 3. Wipe around burner elements areas. 4.Lift the stove top to clean underneath.
Step by Step Instructions for cleaning an electric coil stove
Disclosure: This post contains affiliate links for your shopping convenience.
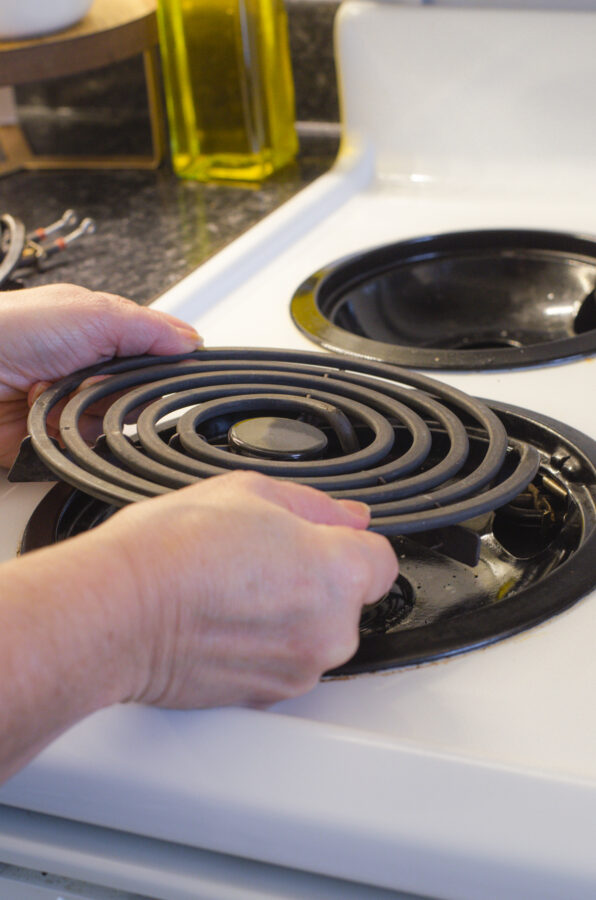
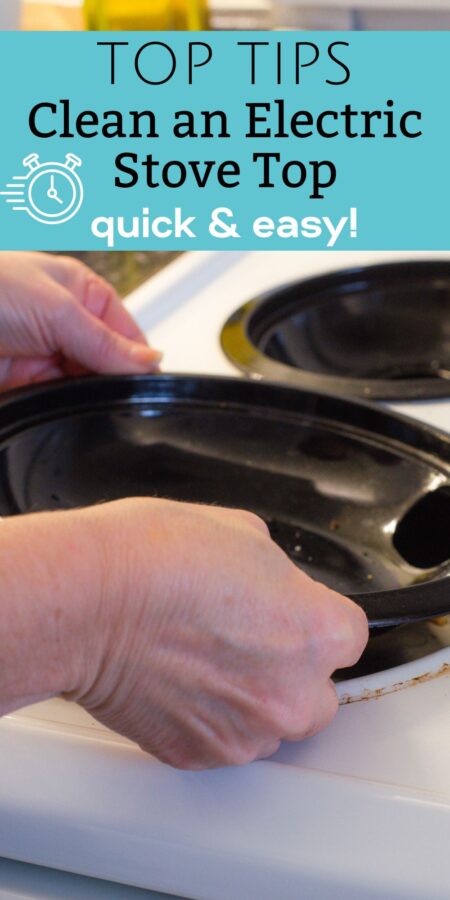
1. Remove the electric stove burners (also known as coil heating elements):
- **It’s very important to ensure the burners of your electric stove are off and completely cold before you begin this step. If you touch the heating coils while they are hot, you will burn your hand.
- To remove the coils on your electric stove, gently pull up on one edge of the cold coil and then pull away (back) from the area it is plugged in. It should come out quite easily.
- Remove each of the four coils of your electric stove and set aside.
- If the stove coils are in need of cleaning, here is a great article on how to clean heating coils on an electric stove.
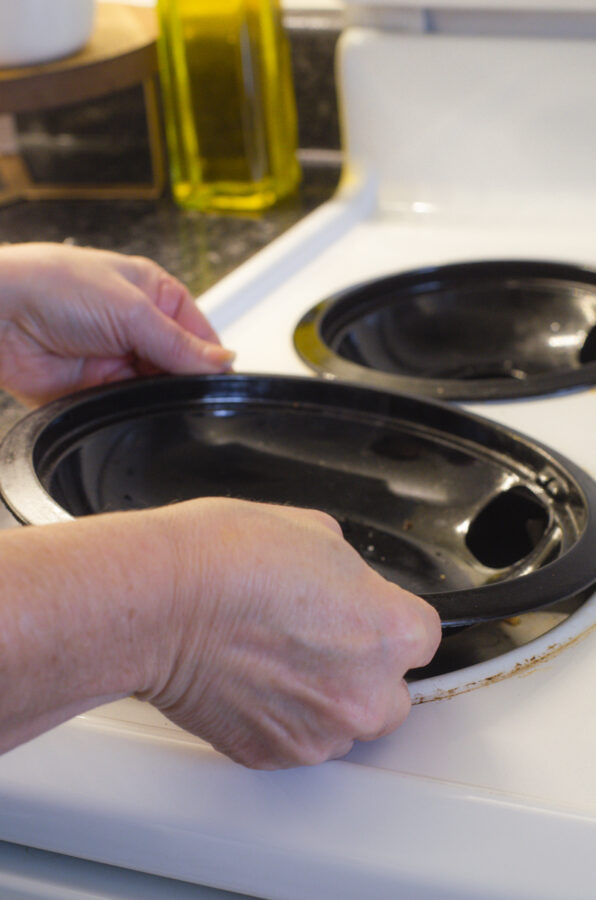
2. Remove the drip pans from the stovetop and wash in hot soapy water
Once the coils are removed from the stovetop, you can simply lift each drip pan out to wash.
If the drip pans have baked on food bits and sticky, greasy buildup, here are some tips to getting them clean:
- Let them soak in hot, soapy water to loosen the grease and build up.
- Use a non-stick scrub pad with a natural cleaning paste (I use the cleaning paste from Norwex, but this might be similar?).
There are a few ways to help make the upkeep of cleaning the drip pans easier. You can purchase disposable drip pans that fit right into your drip pans. They can catch those pesky spills and crumbs, and you can just throw them away when they get dirty.
It is not recommended to cover drip pans in aluminum foil to make cleanup easier.
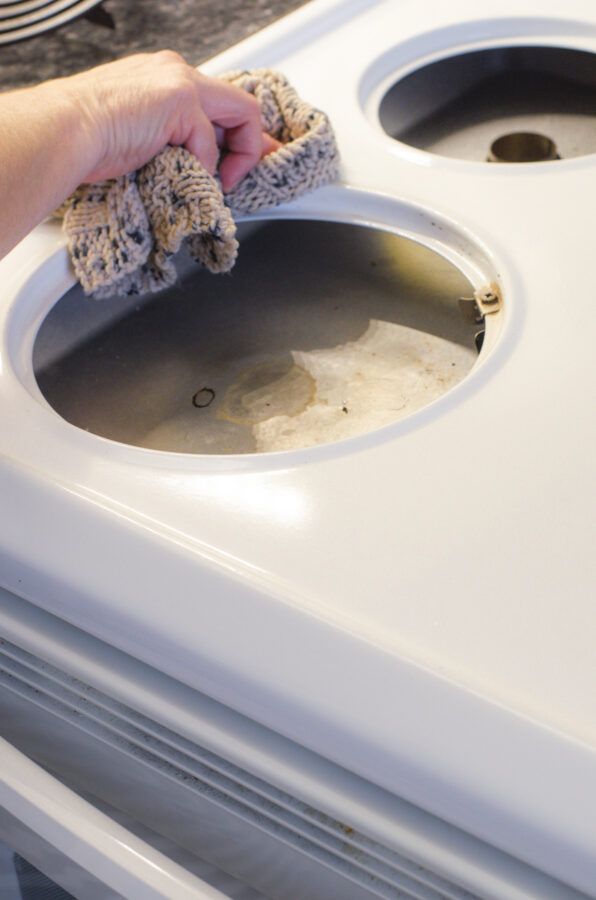
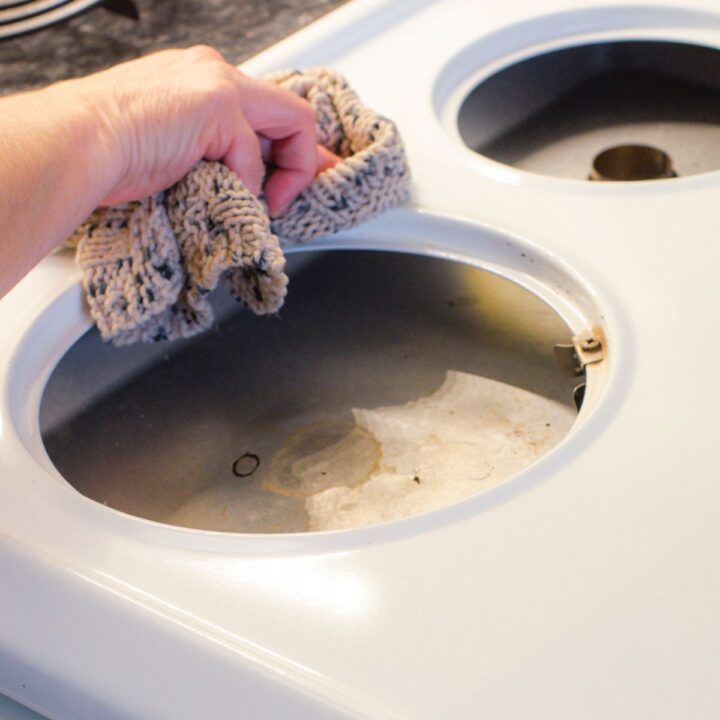
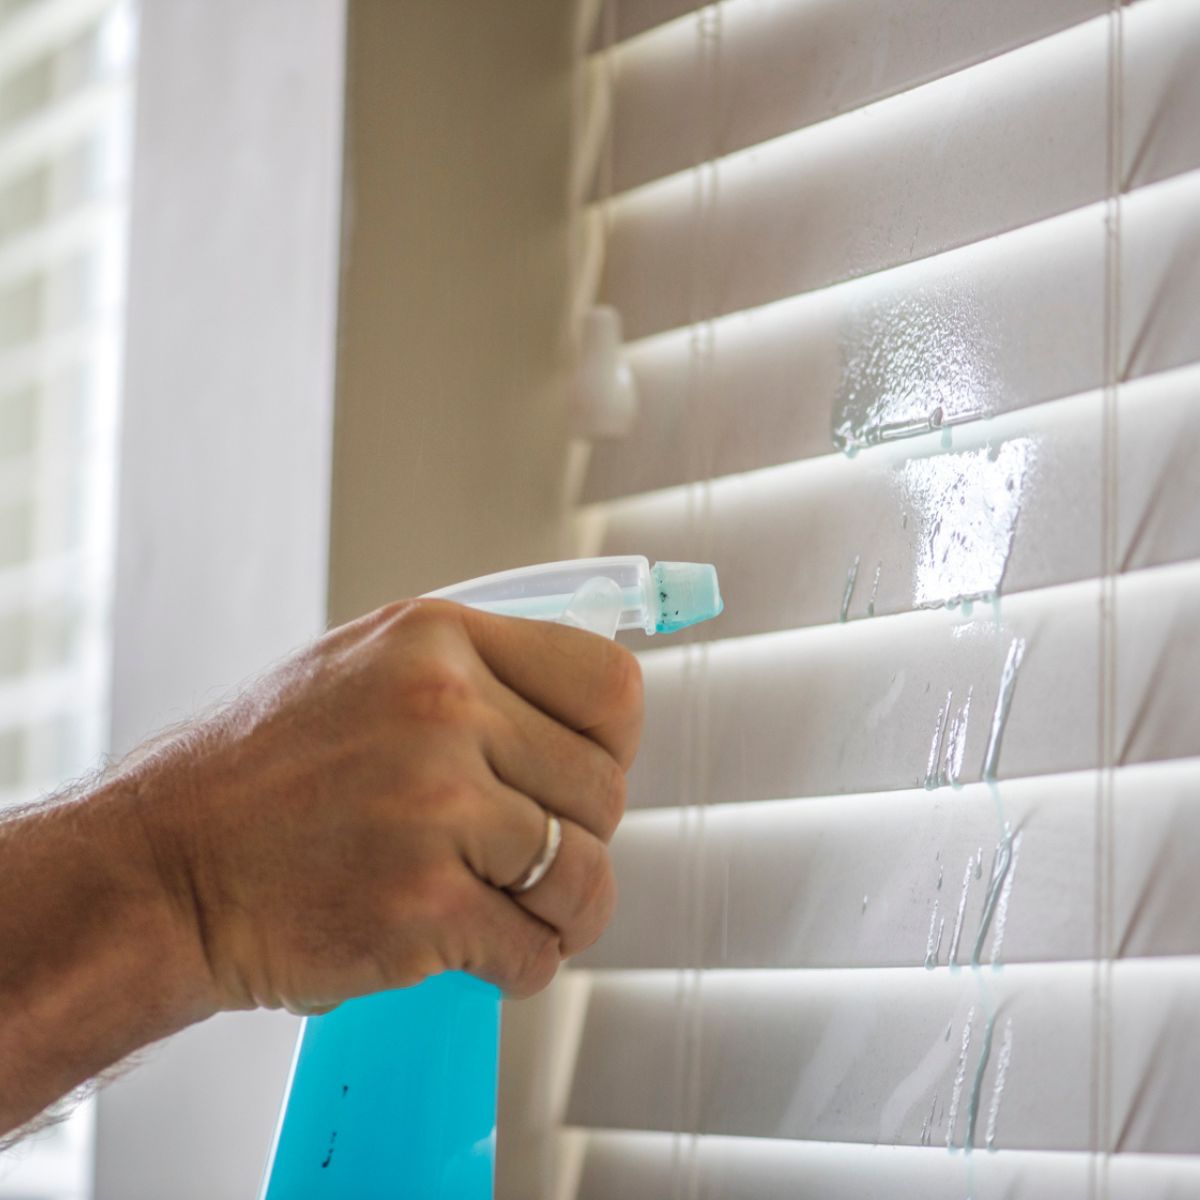
3. Clean the electric stovetop while the drip pans are removed
While the drip pans are out, you now have great access to clean the actual stovetop well. You’ll see lines where the drip pans sit, and those food spills should be cleaned up before they bake on.
To get off pesky spills on your stovetop, you can use:
- A dishrag with soapy water,
- A non stick scrub pad with a natural cleaning paste,
- Sprinkling baking soda over the stained area, or
- A combination of all the above!
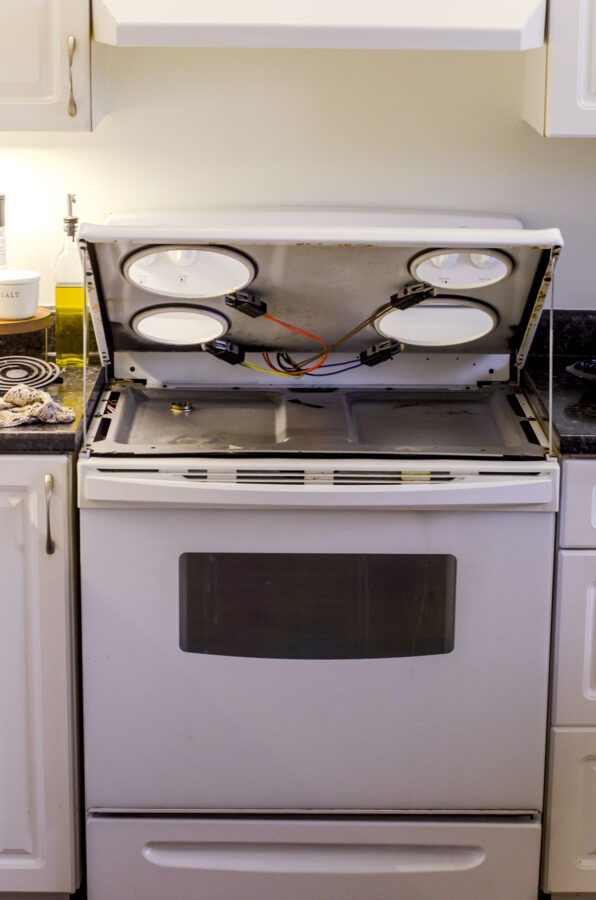
4. Lift the top of the stovetop like a hood of a car and clean underneath!!
I had no idea this mindblowing feature existed in electric stoves until just last year. (My Instagram ladies clued me in.)
Yep, It works! Just lift up on the edge of the stove top and it will slide up until the two poles click and stop on their own. They should stay up without you having to hold it.
This allows you to clean underneath where the elements sit. This is very important, as grease spills can be a fire hazzard if not cleaned up.
While the stovetop is up, lean down and look underneath. You’ll probably see a whole lot of things underneath that need to be cleaned up – as well as on the sides that normally fit snug against your countertop.
5. Lift the top of the stovetop like a hood of a car and clean underneath!!
Once you’ve scrubbed under the stovetop, gently push the side bars holding the top up towards the stove top, and it will slide down again.
Then place the clean drip pans back in and plug in the stove coils in their appropriate slots.
Tada! Your electric stovetop is sparkly clean now!
Helpful Products for Cleaning an Electric Coil Stovetop
Disclosure: The following are Amazon affiliate links:
- The Norwex Spirisponge is one of my favorite cleaning tools. I use it for so many things! The reviews agree with me that it is strong, high quality, long lasting, and does not scratch surfaces. It works well for pots and pans and lasts at least a month without lingering smell.
- I often pair the Norwex Spirisponge (above) with the Norwex cleaning paste. It can be used to clean and electric stovetop and also gets rid of sink stains, baked on stains in pans, and one container lasts a LONG time!
- Microfiber cloth – I use this type of microfiber cloth for many of my household cleaning jobs. It is a super high quality cloth that cleans so well using just water! It’s thick, highly absobant, and the fibers are tightly woven, so they pick up dirt and grime so well!
Story of the filthiest electric stovetop that needed to be cleaned…
One of my favorite parts of my job at the year round camp & retreat center I worked previously was working with the teens and young adults that came to work there. Over the course of 24 years, my husband & I worked with thousands of kids and have so many precious memories of them.
We noticed that the longer we worked there, the less kids tended to know about the basics of daily housekeeping. It was our job, then, to teach them all the things their sweet mommas did for them on the daily – Like how do laundry, wash dishes, and clean bathrooms, for example.
I spent countless hours studying cleaning books and manuals so I could teach them how to clean guest rooms & buildings in teams with as much efficencey as possible.
I put together lists and manuals and cleaning videos, and shared a multitude of laughs with them as we washed dishes, shined mirrors, and folded sheets.
On the day of the infamous filthy stovetop, I was walking through the apartment a group of young adult girls had lived in for 8 months. They were moving out and I was doing the “cleaning inspection”.
They had done an absolutely fabulous job – EXCEPT that stove top!
When I gasped and started taking the stove top apart to clean it, they watched in awe and said, “I didn’t know you could do that!”
We laughed ourselves silly that day as we scrubbed it to a sparkle together.
And, I learned that not everyone knows the absolutely mindblowing features that makes cleaning an electric stovetop easier.
I hope these features and cleaning tips have been helpful to you.
And, if you’re a momma of teens or young adults…show them this post!;)
Other Cleaning Tips & Tricks
- How to make laundry smell good (without dryer sheets!)
- Tips for a clean house
- How to clean glass shower doors
- Tips for cleaning grout on tile floors
Pin this post to remember it later
How to Clean an Electric Stovetop
Simple steps for how to clean an electric stovetop so it sparkles and shines. Learn the amazing built in features that make cleaning it a breeze.
Materials
- Cleaning cloth - a microfiber cloth works the best
- Spirisponge or non-scratching cleaning pads
- All natural cleaning paste or baking soda
- Hot water with dishsoap
Instructions
1. Remove electric stove burners following these steps:
- **It’s very important to ensure the burners of your electric stove are off and completely cold before you begin this step.
- To remove the coils on your electric stove, gently pull up on one edge and then pull away from the area it is plugged in. It should come out quite easily.
- Remove each of the four coils of your electric stove and set aside.
- If the stove coils are in need of cleaning, here is a great article on how to clean heating coils on an electric stove.
2. Remove the drip pans from the stovetop and wash in hot soapy water
Once the coils are removed from the stovetop, you can simply lift each drip pan out to wash.
If the drip pans have baked on food bits and sticky, greasy buildup, here are some tips to getting them clean:
- Let them soak in hot, soapy water to loosen the grease and build up.
- Use a non-stick scrub pan with a natural cleaning paste (I use the cleaning paste from Norwex, but this might be similar?).
3. Clean the electric stovetop while the drip pans are removed
While the drip pans are out, you now have great access to clean the actual stovetop well. You’ll see lines where the drip pans sit, and those food spills should be cleaned up before they bake on.
To get off pesky spills on your stovetop, you can use:
- A dishrag with soapy water,
- A non stick scrub pad with a natural cleaning paste,
- Sprinkling baking soda over the stained area, or
- A combination of all the above!
4. Lift the top of the stovetop like a hood of a car!!
I had no idea this mindblowing feature existed in electric stoves until just last year!
Yep! It works! Just lift up on the edge of the stove and it will slide up with two poles at the edges to hold it up.
This allows you to clean underneath where the elements sit. This is very important, as grease spills can be a fire hazzard if not cleaned up.
While the stovetop is up, lean down and look underneath. You’ll probably see a whole lot of things that need to be cleaned up – as well as on the sides that normally fit snug against your countertop.
5. Assemble your stovetop back together
Once you’ve scrubbed under the stovetop, gently push the side bars holding the top up towards the stove top, and it will slide down again.
Then place the clean drip pans back in and plug in the stove coils in their appropriate slots.
Tada! Your electric stovetop is sparkly clean now!


Omg this is so helpful! I always thought those burnt-on rings were impossible to get off. Trying the baking soda paste trick with my kiddo this weekend – she’ll love that it’s like making a “cleaning volcano” for the stove.
Thanks for the tip about lifting the cook top. I had no idea my stove top could left up.