
Decorating the "Powder Room" – Misadventures!!!
Although the “before” picture doesn’t show it, the ceiling above the shower and the outside wall was clad in cedar boards. One of our sons is dreadfully allergic to cedar, so we needed to remove it immediately after moving in. It was replaced by wonderful, clean and fresh drywall. Of course I needed to paint the new drywall, so just decided to do the whole room right away. I figured it was so small it would be “quick”!!! Oh…so naive…
Removing the wallpaper was step one. However, upon further investigation, I discovered wallpaper underneath the wallpaper. Many moons ago there was an intriguing decorating technique. In fact, I had a dear (91 year old) woman explain it to me. She said, “Dear, you need to find wallpaper you love. Then coat it withe 3 good coats of varnish and it will last forever!” She’s not kidding. There is no way on EARTH you can remove wallpaper that has “3 good coats of varnish” on it!
You guessed it. Underneath the wallpaper was varnished on wallpaper. Although it is not the ideal situation, I have learned from past experience that it is possible to paint wallpaper. The trick is that you must first paint on an oil-based primer. Yuck!
I gatherred supplies and started with the motto in my head – “It won’t take long once I start”…The first problem was when I discovered the paint store inadvertently sold me Kilz Shelac-based (instead of oil-base) primer. It was the worst stuff I’ve ever used. The smell could kill a horse, I’m sure, and it was soooooo thin. As I rolled it onto the ceiling, it rained down on my head! Uggh…
I also discovered the challenges of such tight quarters. Since I’m rather short, I needed a step ladder to reach the top to cut in. The hysterically funny moment occurred when I realized I had wedged myself between the ladder and the closed door. Oopsy!
After the horrendous priming situation, I was thrilled to finally be at the stage of putting the paint color on. I had created a “custom color” by mixing together two paint colors I’d bought cheap as mistints. It turned out to be a sort of “gray cahsmerme” color that I really liked. I thought I was being so clever. Again…so niave.
When those steps were done, the room looked like this:
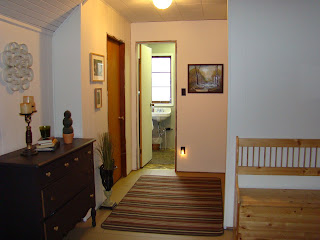
I thought it was quite an improvement and was happy with it. For about 2 weeks. Then things started to go south. I noticed a mark on the wall one day…that grew…until the WHOLE ROOM. WAS. CRACKLE. FINISH. Yikes!! Let me tell you. Although crackle finish looks wonderful in moderation, in a whole room…it is ugly. Really ugly. Like, “it’s so ugly I might cry” ugly…
To be continued…


DON’T MISS A THING!
Join my list for more ideas for you and your home…