
DIY Painted Jars with Folkart Chalk
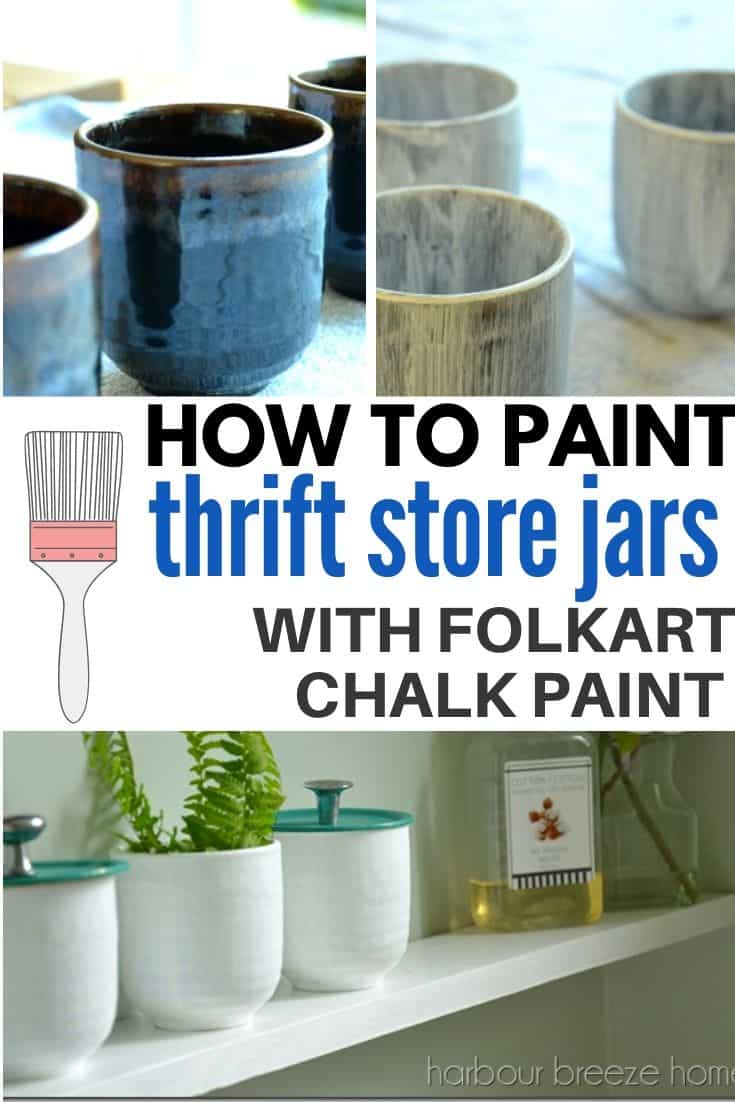
Turn thrifted finds into useful bathroom storage. DIY painted jars with Folkart Chalk is a quick and easy project!
When your main bathroom is approximately the size of a postage stamp, you start to get mighty creative when it comes to storage. As we live with a very small bathroom (that got a makeover here!), I keep working on storage issues that come to light with everyday use.
In perusing our local thrift stores, I came upon a set of these glazed pottery mugs and decided to try a DIY painted jars project to make them fit into the beachy color theme of our bathroom.
Disclosure: This post contains affiliate links for your shopping convenience.
How to Use Folkart Chalk for DIY Painted Jars
Here are the supplies you’ll need
- Thrift store glass containers – These were glazed pottery, but you can try this with clear glass jars as well.
- Folkart Chalk in colors Adirondack and Grotto
- Mason Jar Lids
- Craft paint brush
- Small drawer handle knobs (similar to these)
- Hot glue and hot glue gun

1.Wash containers well, ensuring no paint or residue is stuck to the surface.

Paint doesn’t stick well to dirt or grime. So make sure it’s really clean!
2. Using a paint brush, apply the first coat of paint going in the same direction.

Try to paint with long brush strokes and make it as smooth as possible.
3.Follow manufacturer’s directions for dry times for following coats of paint.
Don’t make the same mistake as I did! I failed to read the instructions that clearly stated you should wait 2 hours before painting the next coat!
The paint seemed to dry very quickly, so I kept building up the paint coverage with additional coats of paint.
In the end, I painted 5 coats of paint, but that could perhaps be cut back if proper dry time were given.
4. Paint mason jar lids the color “grotto”

The Folkart paint coated the mason jar lid well with just one coat!
4.Once the paint has dried well, seal all painted surfaces with Folkart clear sealer.
Folkart’s clear sealer is applied just like paint with a brush and dries to a nice smooth and clear finish.

5. Glue on knobs to the mason jar lids with hot glue and glue gun.
These little DIY painted jars with lids are a wonderful small bathroom storage idea. They fit well on the narrow shelf above the sink and toilet and hold cotton balls and q-tips.

What are some of your small bathroom storage solutions?
For more small bathroom storage ideas, you might want to check out these posts.
For the details of the yellow “Enjoy the Little Things” sign, click here.
{Disclosure: I was compensated for this post with product from Folkart. However, all opinions are my own.}
I’ve never seen this post! So glad I got to see it at Tuesday Turn About! Hugs!
These turned out so cute! I have a couple things in my home that could benefit from a few coats of paint, too:)
That is such a cute idea! I have a couple decorative jars but had to look pretty hard and they aren’t great with my current decor. Maybe I should try so,etching like this. I have a request for a picture of your creations along with the advertisement’s picture.