
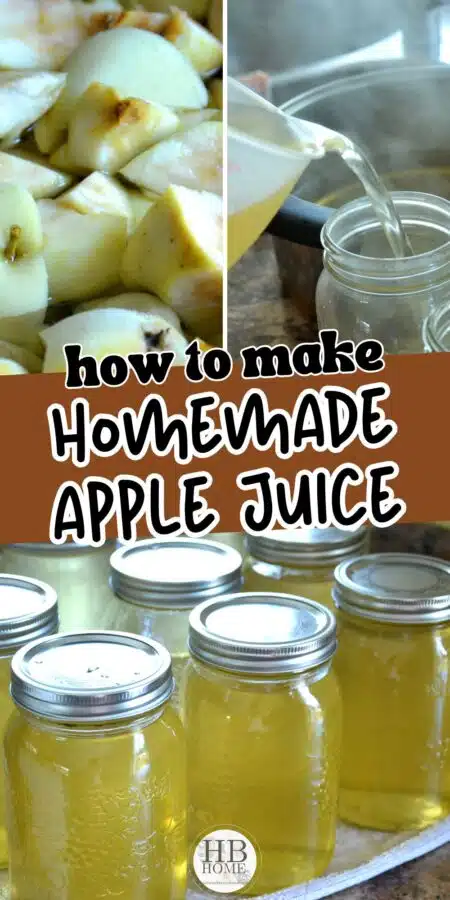
How to Can Homemade Apple Juice that is Clear
Learn how to make clear apple juice at home using a simple, old-fashioned method. This homemade apple juice recipe produces smooth, pulp-free juice every time.
I have a complicated relationship with apples. True confession -I’ve never cared for them much myself and often find them hard on my stomach. However, for many years we lived with apple trees in our backyard, and I knew it was a luxury to have such beautiful fruit right outside our door. My family loved apples, and each fall we had more than we knew what to do with.
Over the years, I tried all kinds of ways to use them up. One year it was apple pies til the cows came home. Another year, applesauce. But my very favorite way to process apples came from my mother-in-law—a super simple, no-fuss way to make clear homemade apple juice.
Before you read on, you should know one thing: my mother-in-law rarely used recipes. What follows is not a recipe with exact measurements, and that’s actually part of the beauty of it. You can make a small batch or a very large batch, depending entirely on how many apples you have on hand.
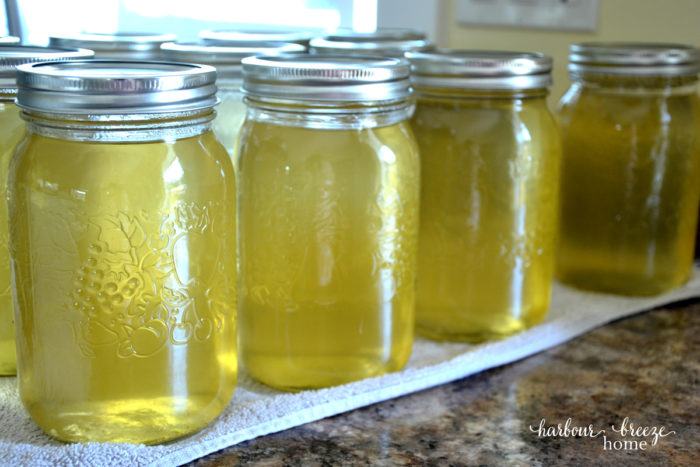
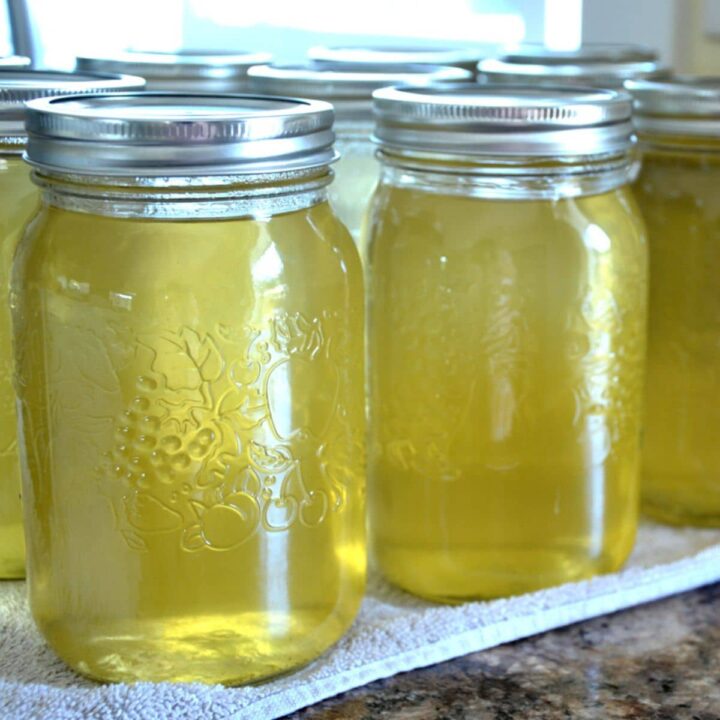
This method produces clear apple juice—not cloudy, not pulpy—and that’s what sets it apart from many homemade apple juice recipes made with a press.
What Makes This Apple Juice Clear
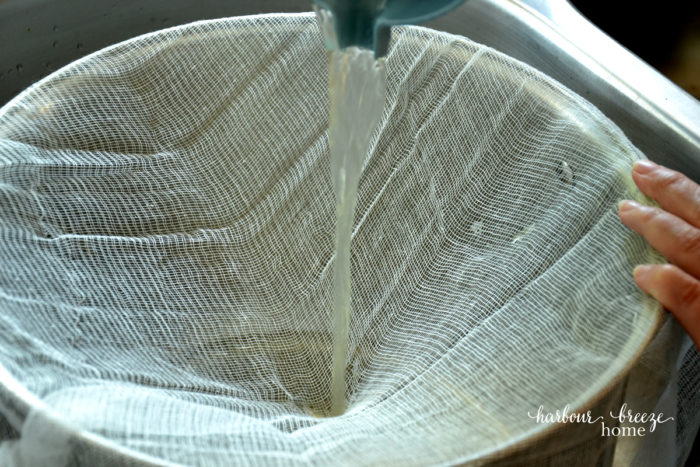
The secret to clear apple juice is time and heat. Pouring boiling water over chopped apples draws the juice out naturally. After sitting for a day or two, the apples release their flavor into the water, leaving behind juice that strains beautifully through cheesecloth.
The result is a smooth, clear juice with pure apple flavor—no thick pulp and no pressing required.
Supplies Needed for Clear Homemade Apple Juice
You’ll need basic canning supplies for this recipe:
- Fresh apples (any variety)
- Wide-mouth canning jars
- Lids and rings
- A sharp knife
- A large bowl or container
- A large stockpot
- Cheesecloth
- Canning tongs

How to Prepare Your Canning Supplies
I encourage you to read all the instructions for this juice recipe before you dive right in. It is a mult-day recipe. You will first need to prepare the apple juice and then can it.
Before you begin canning anything, it’s important your canning supplies are clean and ready. Here is how to prepare your canning supplies:
- Sterilize your jars.
Jars need to be clean and sterilized before using. You can do this by running them through the dishwasher on a hot cycle or by washing them in hot, soapy water and rinsing well. Once cleaned, keep the jars warm and ready to use until it’s time to fill them. - Prepare the lids and rings.
While the apple juice is heating, I place the lids and rings in a pot of boiling water on the back burner. This keeps them hot and ready so they’re easy to work with when it’s time to seal the jars. - Set up your workspace.
I line up my hot, sterilized jars on a towel on the kitchen counter. Nearby, I have the pot of boiling lids and rings, canning tongs, and hot pads within easy reach. - Be ready to work while everything is hot.
When the apple juice is hot and ready to pour, everything I need is already in place. I use tongs to lift a lid and ring from the boiling water, place the lid on the filled jar, and use a potholder to securely twist the ring on.
Having your jars, lids, and tools prepared ahead of time makes this step much less stressful and helps the whole process move smoothly.
Step by Step Instructions for How to make Apple Juice
This method works for any amount of apples that you are working with. You will just need to adjust the amount of jars and containers needed to accomodate your specific batch size.
Step 1 (not pictured): Chop each apple into 4–6 pieces and place them in a large container or containers. Pour boiling water over the apples until they are almost completely covered. Cover the container and let it sit at room temperature for 24–36 hours. Even up to 48 hours works well.
The amazing science of this method is that the boiling water pushes the juice out of the apples and then absorbs into them. If you take a tiny taste of the apples after the alloted time, it will just taste like water!

2.Use a strainer to remove the apple pieces from the containers ofjuice. 2.Strain the juice using cheesecloth. 3.Add sugar (to taste) and boil until sugar dissolves.

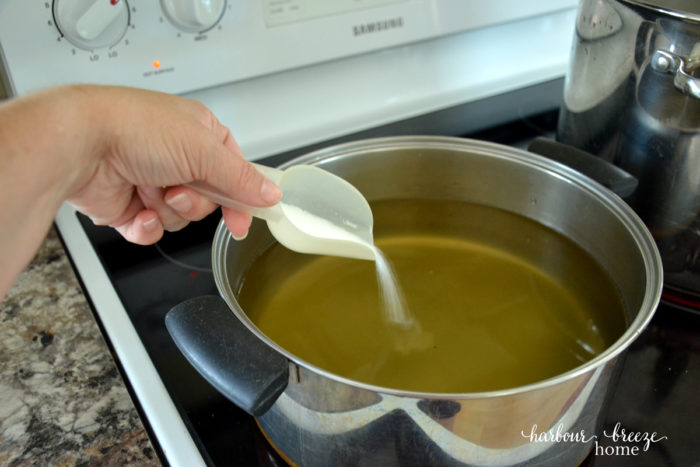
5.Pour hot juice into sterilized jars. 6.Place hot lids and rings on jars and twist tightly. Process in hot water bath if you choose.

{We ended up folding the cheesecloth in half and straining again since this was such a large mesh.}
Canning and Storage Notes
Many people recommend processing apple juice in a hot water bath, which is the safest and most widely recommended method. If you are new to canning, following proper water bath canning guidelines is strongly encouraged.
But, in total transparency, I have never done a hot water bath, as my mother-in-law never taught me that. A brief look through my comments of this post will show the outrage of people who insist that a hot water bath is necessary…;)
Once jars are processed and cooled, listen for the lids to pop as they seal. After cooling completely, press the center of each lid. If it doesn’t move, the jar is sealed. Any unsealed jars should be refrigerated and used within a few weeks.
Store sealed jars in a cool, dry place.
Here is a handy video for how to do a hot water bath:
Pat yourself on the back, get yourself and cold drink, and put your feet up. You did it!! Yeah!:)
The Story Behind this homemade apple juice post
My mom was a canner. Summertime for her was working in the garden ~ picking beans, cucumbers, corn, peas, & tomatoes. Then she would cut, shell, snap, and blanch until things were ready for canning jars and boiling water baths.
I must say, I did my share of helping (reluctantly, if I’m honest) in those days, but I didn’t grow up to be a virtuous canning woman.
In fact, I might haveat one time thrown out a whole baby bathtub full of picked beans because I just didn’t have the energy to process them…
I know. Scandelous!!
But, over the years I’ve gingerly dipped my toes into the world of canning. Blackberry jam is my favorite. And, when our son from Alberta came to visit one Fall, he reminded me of the apple juice I used to make.
He wanted to take some back to his friends, so he did almost all the work, and we helped at the end and took pictures of the process!
It’s now one of my most popular posts on the blog, and I’m glad for the documentation of this memory!
Happy Apple Juicing!
Other canning recipes and resources
- Canning jam :Supplies you’ll need
- Canning recipes perfect for beginners
- You might want to try some blackberry jam (no pectin required…), too!
More Apple Recipes:
- Old fashioned apple cobbler uses fresh apples and has a yummy sweet, biscuit like topping.
- Fresh apple cookies with glaze are a delicious treat.
- If you have an air fryer, you’ll love these air fryer apple fries!
- Easy apple crisp is a super quick dessert recipe thanks to the convenience of canned apple pie filling!
Want to get more recipes and dinner ideas delivered right to your inbox?
Join thousands of others on my newsletter list & have them delivered right to your inbox! Sign up here.
Pin this to remember it later!
Clear Homemade Apple Juice
A simple, old-fashioned method for making clear apple juice at home without a press. Flexible for small or large batches.
Ingredients
- Fresh apples (as many as you have)
- Water (boiling)
- Sugar (optional, to taste)
Instructions
- Chop apples into 4–6 pieces and place in a large container.
- Pour boiling water over apples until nearly covered. Cover and let sit 24–36 hours (up to 48 hours).
- Strain juice through a strainer, then through cheesecloth.
- Heat strained juice and add sugar to taste, bringing to a boil to dissolve.
- Pour hot juice into sterilized jars and seal with lids and rings.
- Process in a hot water bath if desired, following safe canning guidelines.Storage:
Store sealed jars in a cool, dry place. Refrigerate any unsealed jars and use within a few weeks.


This is such a helpful guide! I’ve always wanted to try canning my own apple juice, and your tips on achieving clarity are exactly what I needed. Can’t wait to give this a try with the apples from my garden! Thank you for sharing!
I loved this post! The tips on using a fine mesh strainer and letting the juice settle before canning were really helpful. I can’t wait to try making my own clear apple juice at home! Thanks for sharing your expertise!
This post was super helpful! I’ve always struggled with getting my apple juice to be clear, but your tips on using a fine mesh strainer and letting it settle really made a difference. Can’t wait to try this method with my next batch! Thank you for sharing!
This was such a helpful post! I’ve always struggled with cloudy apple juice, but your tips on straining and using the right apples made a big difference. I can’t wait to try it! Thanks for sharing your expertise!
Great tips! I love the idea of adding lemon juice for clarity. Can’t wait to try making my own apple juice this fall!