
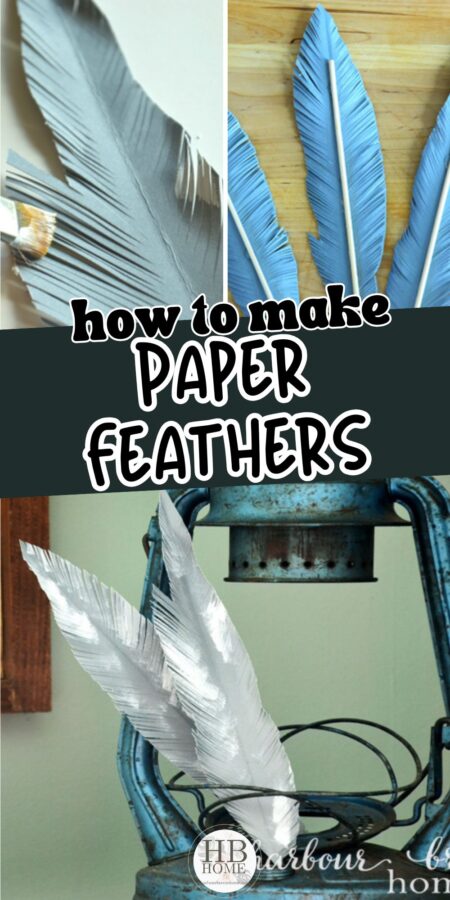
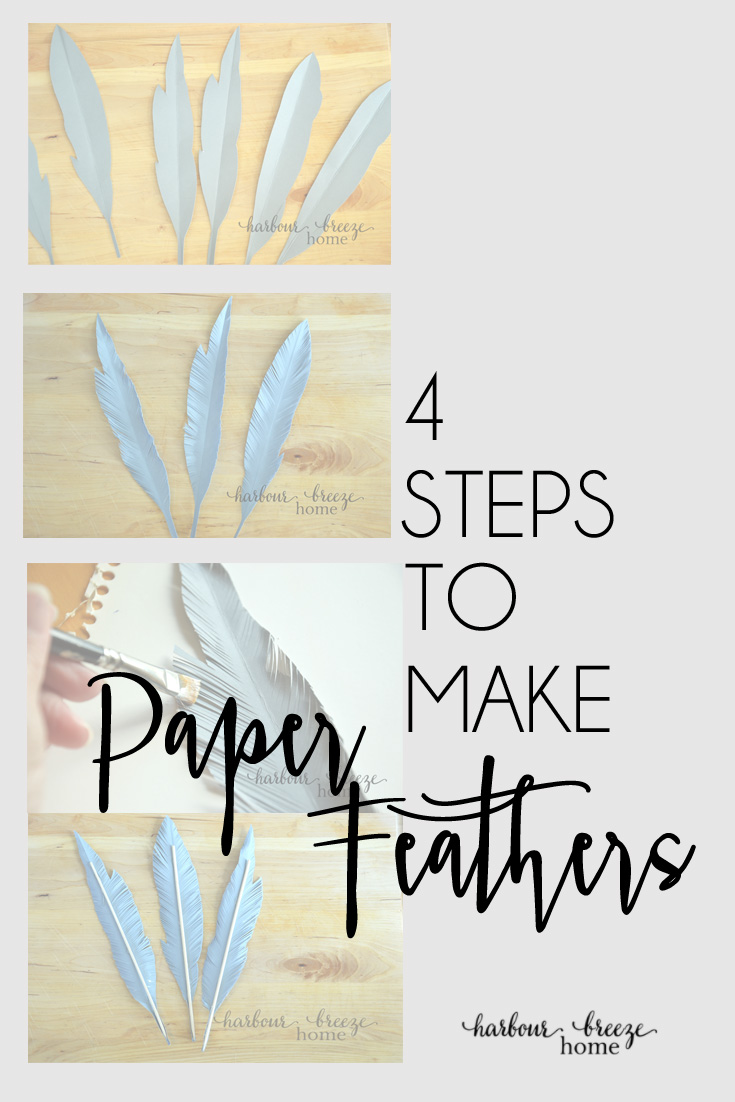
Simple Handmade Paper Feathers
Learn how to make simple handmade paper feathers using scrapbook paper or book pages. An easy, budget-friendly DIY craft for home decor.

I’ve always loved paper. When scrapbooking and card making were all the rage, I was all in. I loved it so much that I even taught classes on card making and paper crafts. I spent hours pouring over ideas and spent many delightful hours cutting, layering, embossing, and experimenting with paper of all kinds.
Like many of us, those years left me with a bit of a “stash” of beautiful paper and supplies that I just couldn’t part with. And honestly, I’m glad I kept them. Simple crafts like these handmade paper feathers are a wonderful way to use what you already have while enjoying a fun little craft.
This is a quick project doesn’t require perfection or special tools. If you have leftover scrapbook paper, cardstock, or even old book pages tucked away, you already have what you need to make these.
Paper feathers are a lovely reminder that decorating doesn’t have to be expensive or store-bought. Sometimes the best pieces are the ones you make yourself. And this project could be a fun one to do with your kids or grandkids, too!
Supplies Needed to Make Paper Feathers
- Cardstock or scrapbook paper (any color you like)
- Pencil
- Scissors (the sharpest pair you have)
- White acrylic craft paint
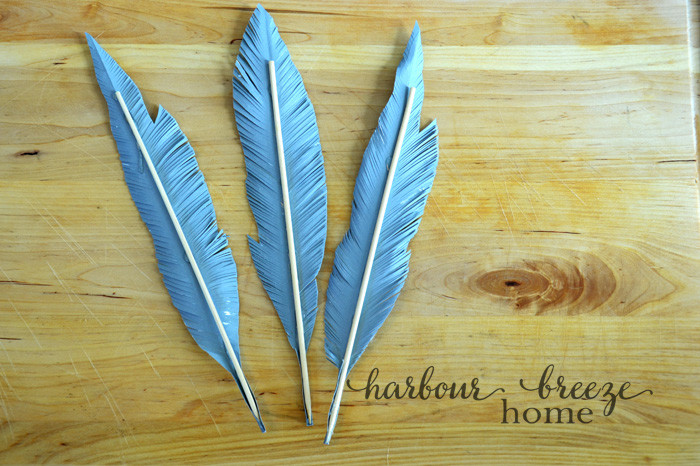
- Bamboo skewers (optional)
- Glue (optional)
You can also use old book pages, sheet music, or patterned paper depending on the look you want.
Step by step instructions for feathers made out of paper:

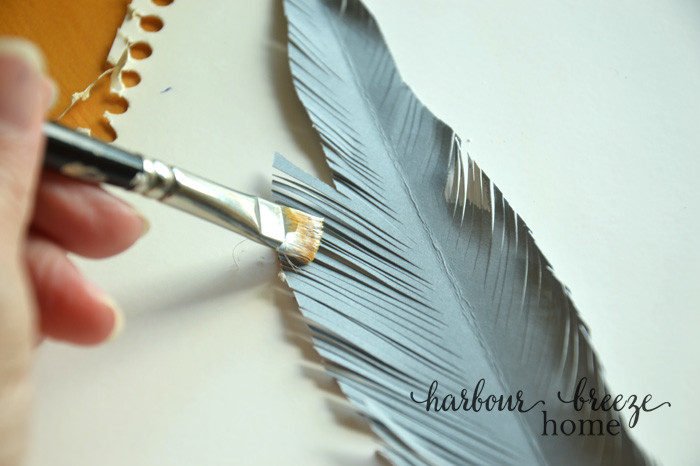
1.Freehand cut feather shapes out of paper. 2.Cut feather edges with sharp scissors. 3.Use acrylic paint to add dimension to the edge of the feathers.

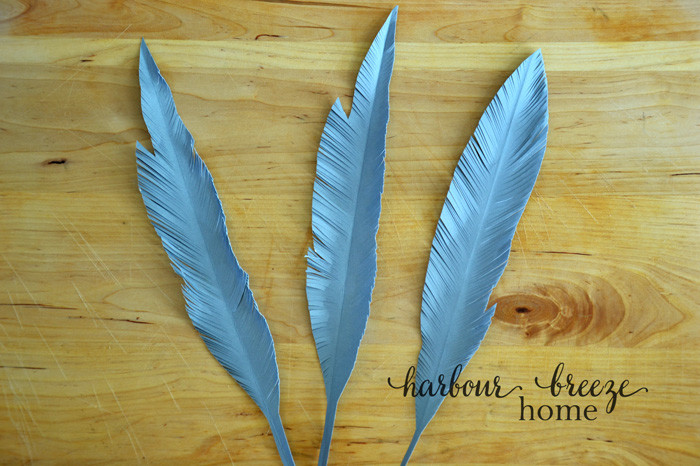
**Tip: Once you have the feather edges cut, curl them around a pencil gently to give the feathers a more realistic shape.
How to Decorate With Paper Feathers
Handmade paper feathers are surprisingly versatile. Here are a few simple ways to use them around your home:
- Arrange them in a vase on a buffet or shelf
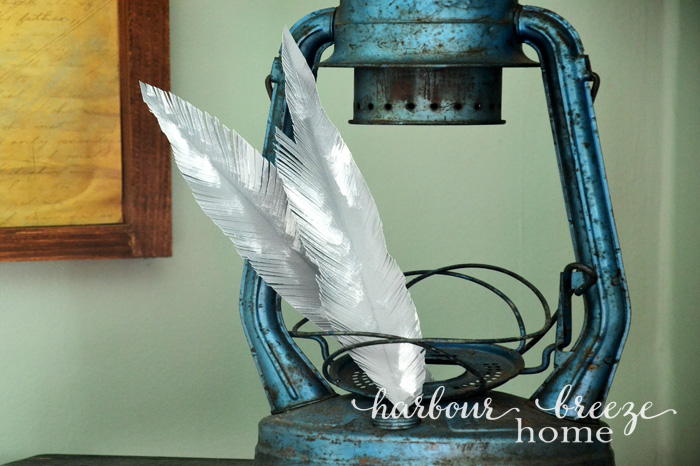
- Tuck a few into an old lantern or decorative container
- Use them as part of a seasonal centerpiece
- Hang them as ornaments on a Christmas tree
- Scatter them along a Thanksgiving table for a handmade touch
Changing the paper color or using book pages gives you endless options for different seasons and styles.
More paper craft ideas:
Get more ideas for your home delivered right to your inbox.
Join thousands of others on my newsletter list & have them delivered right to your inbox! Sign up here.
Pin this to find it later!

Simple Handmade Paper Feathers
An easy paper craft using scrapbook paper or book pages to create handmade feathers for budget-friendly home decor.
Materials
- Cardstock, scrapbook paper, or book pages
- Pencil
- Scissors
- White acrylic craft paint
- Small paint brush
- Bamboo skewers (optional)
- Glue (optional)
Instructions
- Sketch and cut out feather shapes from paper.
- Fold each feather in half lengthwise to form a center spine.
- Cut small slanted snips along the edges with scissors.
- Curl edges gently around a pencil.
- Lightly paint the tips with white acrylic paint.
- Glue a bamboo skewer to the back if using as a standing decoration.
Do you have any advice on the best way to stiffen papers that one might like to use than are thinner than card stock or craft papers? I know you referenced book pages…does the acrylic paint stiffen the paper enough to keep the feather shape?
While it’s not official Minecraft the charm of Eaglercraft is how close it gets to that experience without the need to pay or install anything at all.
While it’s not official Minecraft the charm of Eaglercraft is how close it gets to that experience without the need to pay or install anything at all.
I love your feathers! I am about to make a large wall hanging of angel wings, to go with the angel decor in my bedroom. You have saved me, by making these feathers less complicated!!! I will start right away!
It very beautiful please can you teach me how to make flower